Dadafu
A family building guide
Dinosaur Slide
63 magnetic tiles · 14 steps
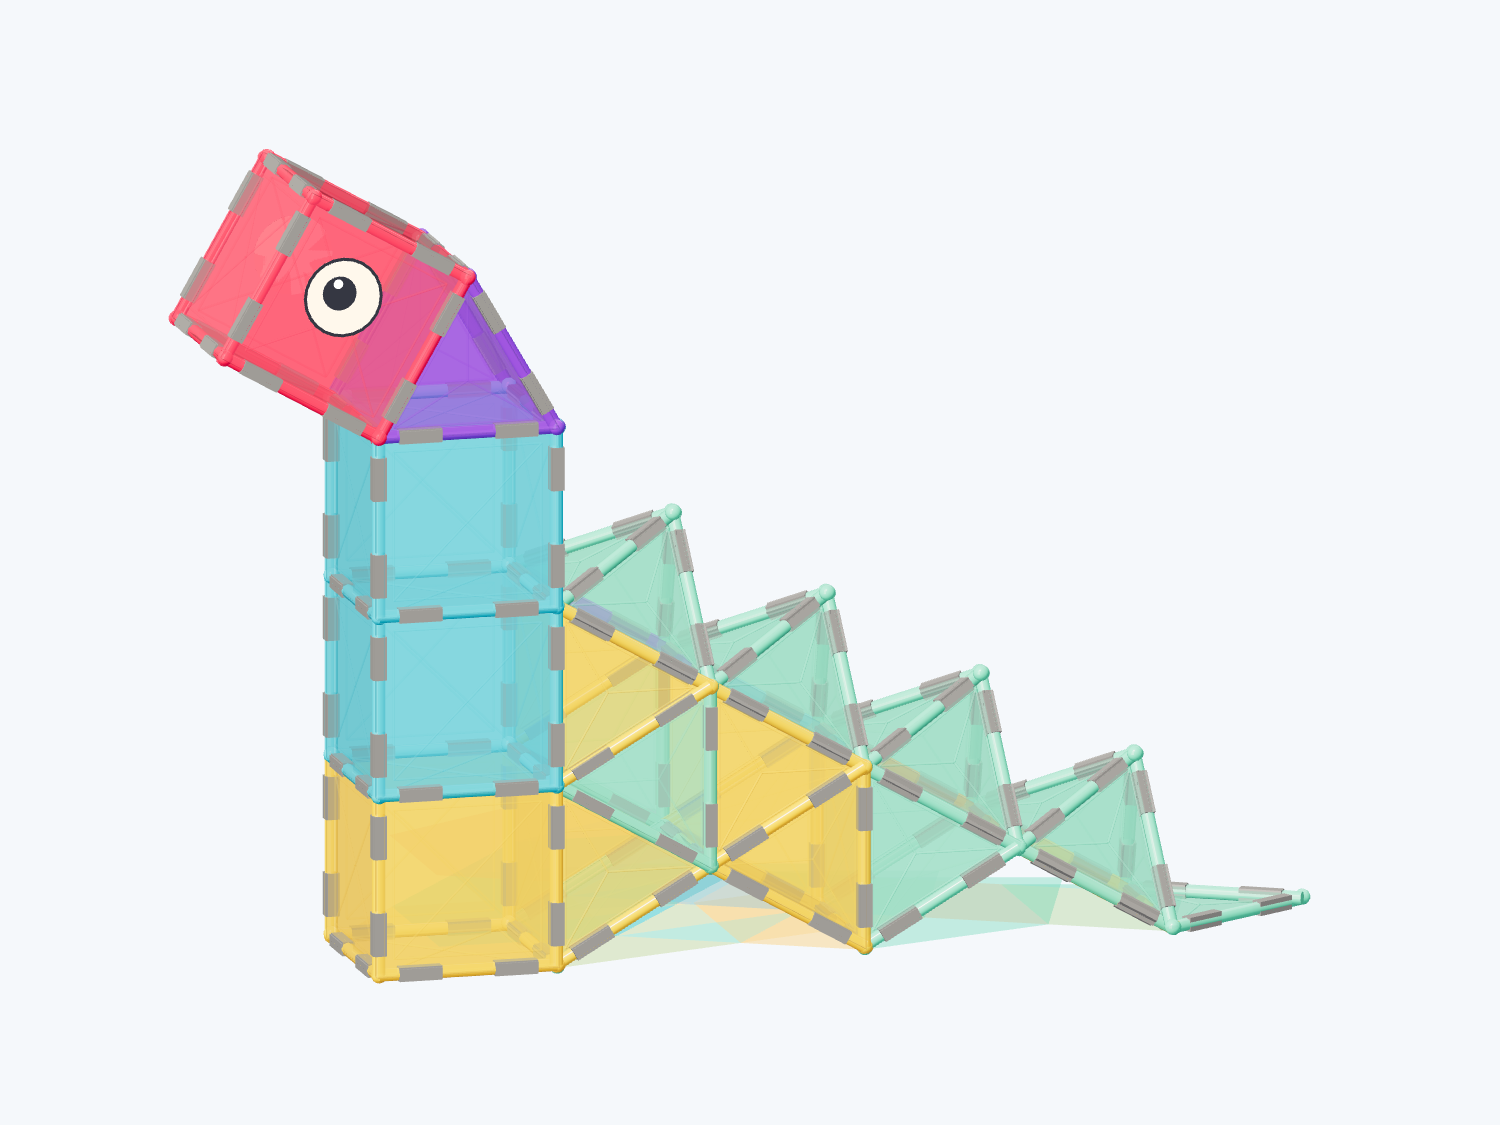
A raised pink head, yellow-green belly and rainbow back with green spines
What pieces do you need?
- ×32square tiles
- ×31equilateral triangle tiles
- ×2eye stickers (optional decoration)
Compare with your tile set
Choose the exact set to compare quantities. For other brands or mixed boxes, use each plan’s piece list.
The rainbow dinosaur raises its pink head to hear a friend on the hill. Build a yellow front foot and blue neck, fill in the yellow-green belly, then follow four rainbow back sections to the pointed green tail and add another sentence to the story.
Before you build with real tiles
- Use Basic squares and equilateral triangles with one shared unit edge length. Substitute colors as needed. A one-level front foot carries two blue neck levels. A purple triangular throat supports the compact pink square head, raised forward at about 30 degrees.
- Yellow and green equilateral triangles fill both body sides on one sloping-edge grid. Two sloping belly squares and the rear foot bottom close the underside. Keep a small ground-level notch between the feet; real connected facets fill the body below the back.
- The yellow rear foot is a triangular prism pointing forward, with a vertical rear wall one square high. Four back squares each drop half a square height from the two-level neck edge to the ground. The lower edge of section two joins the rear foot wall top.
- Four groups of green spines use four triangles each, sixteen in total. Close each cap and join its bases around one of the four sloping back squares. Finish the tail with one flat green triangle tapering to a point. Never insert triangles through square panels.
- This is a dinosaur-shaped slide sculpture, never for children or heavy objects to ride. The app checks vertical falling and geometric balance, but cannot measure real magnet strength or sliding behavior. An adult should hold the pitched head, tall neck and back while checking sections. The eyes are thin stickers. Remove the head and spines before lifting underneath the feet and belly.
How to build it, step by step
1. Place the yellow front foot base
Add in this step: 1 square tiles
Lay one yellow square flat. The front foot and blue neck will rise directly above it.
Hands-on tip: Keep the base flat on the table and leave room for the raised head.
2. Close the sturdy yellow front leg
Add in this step: 5 square tiles
Enclose the base with four yellow squares and add a blue cap to finish the front leg.
Hands-on tip: Join adjacent walls first while an adult steadies the unfinished leg.
3. Add blue neck level 1
Add in this step: 5 square tiles
Build four blue walls and close a square roof at this level. Two blue levels raise the head above the yellow front foot.
Hands-on tip: Close the current roof before adding another level. An adult should steady the neck without pulling its top tiles.
4. Add blue neck level 2
Add in this step: 5 square tiles
Build four blue walls and close a square roof at this level. Two blue levels raise the head above the yellow front foot.
Hands-on tip: Close the current roof before adding another level. An adult should steady the neck without pulling its top tiles.
5. Close the yellow rear foot near the belly
Add in this step: 3 square tiles · 2 equilateral triangle tiles
Make a forward-pointing wedge with yellow triangle sides, sloping square bottom and top, and one vertical square at the rear.
Hands-on tip: Place the grounded rear wall and bottom first, then close the sides and top. Keep the rear wall top one square high.
6. Close the underside with two sloping belly squares
Add in this step: 2 square tiles
Join one slope upward from the front foot rear edge and another toward the tail from the rear foot ground edge. The rear foot bottom already forms part of the belly.
Hands-on tip: Both new squares have lower edges on the ground. Join their edges to the feet without covering the existing rear-foot bottom with another tile.
7. Fill one body side with yellow and green triangles
Add in this step: 5 equilateral triangle tiles
Start at the vertical neck edge and alternate five yellow-green triangles to fill the body beneath the back. Keep the existing yellow rear-foot side panels.
Hands-on tip: Join complete edges on one side. Do not overlap the rear-foot side or push a triangle through the belly bottom.
8. Fill one body side with yellow and green triangles
Add in this step: 5 equilateral triangle tiles
Start at the vertical neck edge and alternate five yellow-green triangles to fill the body beneath the back. Keep the existing yellow rear-foot side panels.
Hands-on tip: Join complete edges on one side. Do not overlap the rear-foot side or push a triangle through the belly bottom.
9. Make a purple triangular throat for the raised head
Add in this step: 2 equilateral triangle tiles · 2 square tiles
Add two purple triangles above the neck and close their front and rear slopes with squares. The forward slope will become the back face of the pink head.
Hands-on tip: Join the full triangle bases to opposite neck-roof edges. Close their sloping edges with squares while an adult supports the section.
10. Raise the compact pink square head forward
Add in this step: 5 square tiles · 2 eye stickers (optional decoration)
Pitch two pink side squares forward at about thirty degrees and join their rear edges to the throat slope. Close the chin, front and top to make a compact head.
Hands-on tip: The purple throat slope already forms the head back, so do not add another rear wall. An adult should support the pitched head; use thin eye stickers only.
11. Join four rainbow back sections to the ground
Add in this step: 4 square tiles
Start at the back neck edge two squares high and join four squares along the filled body top. Section two meets the yellow rear-foot top edge; section four reaches the ground.
Hands-on tip: An adult should hold the slope, join each full body-top edge and inspect the seams. This slide-shaped sculpture does not carry children or heavy objects.
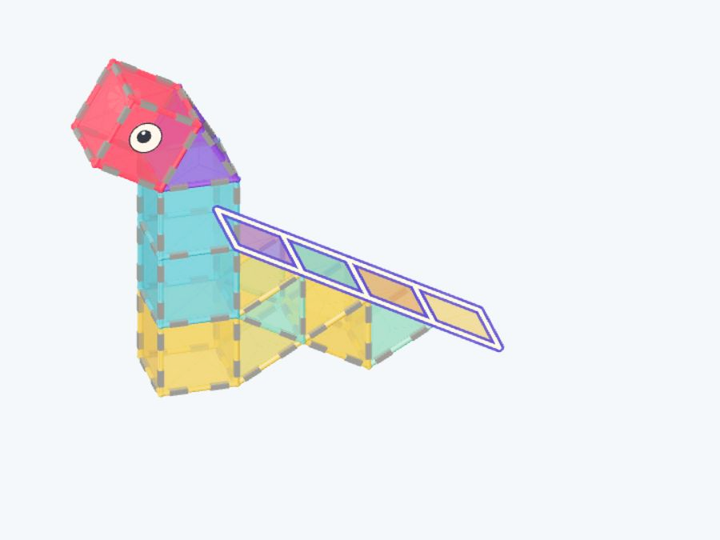
Step 11 / 14 12. Make a contrasting green serrated back · 1
Add in this step: 12 equilateral triangle tiles
Close the triangles for this step into groups of four, then place each cap around its matching rainbow slope square.
Hands-on tip: Preassemble every four-panel cap beside the model, then join its bases around all four edges of one slope square. An adult supports the slope; no single panel stands alone.
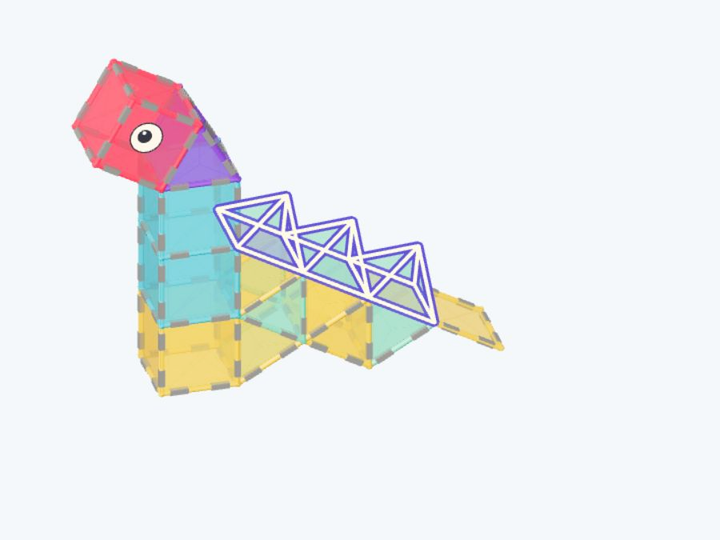
Step 12 / 14 13. Make a contrasting green serrated back · 2
Add in this step: 4 equilateral triangle tiles
Close the triangles for this step into groups of four, then place each cap around its matching rainbow slope square.
Hands-on tip: Preassemble every four-panel cap beside the model, then join its bases around all four edges of one slope square. An adult supports the slope; no single panel stands alone.
14. Finish with a small pointed green tail
Add in this step: 1 equilateral triangle tiles
Join one flat green triangle to the last lower slope edge. Its wide base meets the back and its point extends outward to taper the tail.
Hands-on tip: Keep the triangle tip entirely on the ground without another long square extension. Remove the pitched head and spines before lifting under the feet and belly.
A little help for grown-ups
You do not need to plan a lesson. Use these prompts when you reach a tricky step, or when your child wants to try an idea of their own.
1. Place the yellow front foot base
Point toward the head and leave the other side clear for the belly and tail.
See this step2. Close the sturdy yellow front leg
Take turns joining neighboring walls and count the four corners.
See this step3. Add blue neck level 1
Trade the holding and placing jobs after each level. Whose voice can the dinosaur hear?
See this step4. Add blue neck level 2
Trade the holding and placing jobs after each level. Whose voice can the dinosaur hear?
See this step5. Close the yellow rear foot near the belly
Find its wide ground-contact edge. Where will it help support the descending back?
See this step6. Close the underside with two sloping belly squares
Look low down. What little bridge does the notch between the feet resemble?
See this step7. Fill one body side with yellow and green triangles
The other builder checks from the side. Has every triangle edge found its partner?
See this step8. Fill one body side with yellow and green triangles
The other builder checks from the side. Has every triangle edge found its partner?
See this step9. Make a purple triangular throat for the raised head
When the dinosaur raises its head, which purple section helps hold it?
See this step10. Raise the compact pink square head forward
Whose voice is the dinosaur listening to? Find its eyes from both sides.
See this step11. Join four rainbow back sections to the ground
Count four rainbow sections and find the yellow-green supports beneath them.
See this step12. Make a contrasting green serrated back · 1
Find the green zigzag from the front. What little mountain might be hiding on the dinosaur back?
See this step13. Make a contrasting green serrated back · 2
Find the green zigzag from the front. What little mountain might be hiding on the dinosaur back?
See this step14. Finish with a small pointed green tail
What can a friend hear at the tail point? Add one sentence each.
See this stepTake this plan to the building table
Your subscription includes printing and saving PDF guides: materials, views, building steps and parent tips, ready for your family to use together. A parent manages sign-in and the subscription.
Print / Save as PDF