Dadafu
A family building guide
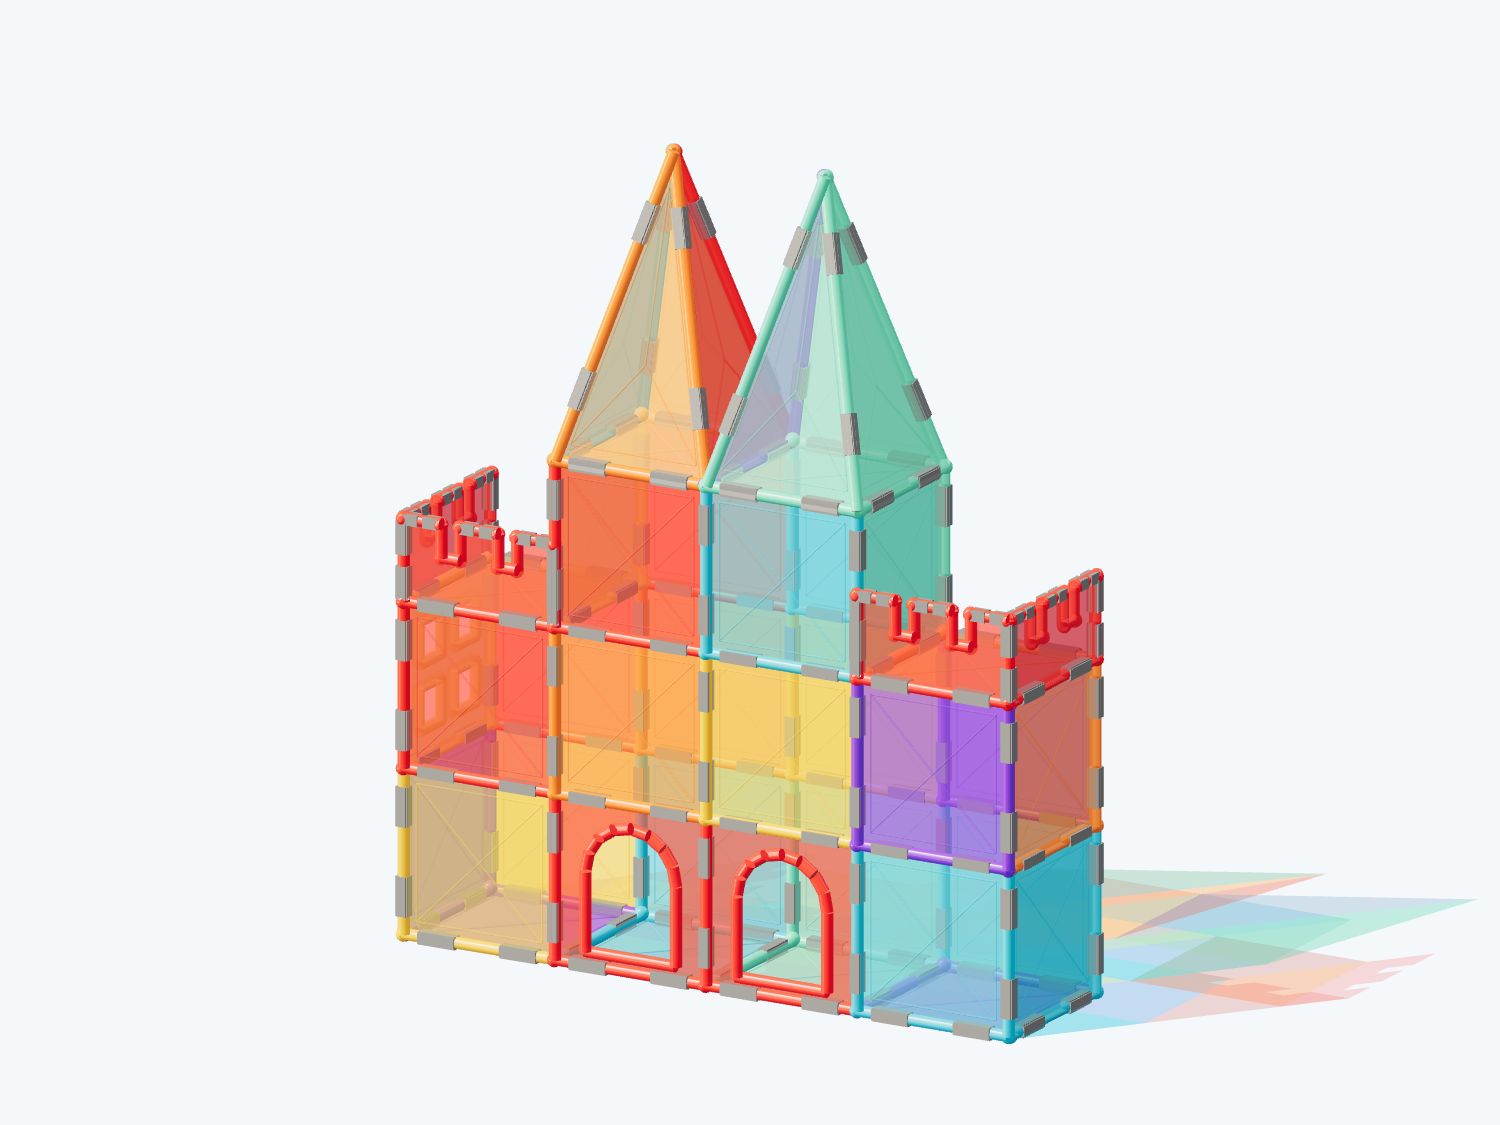
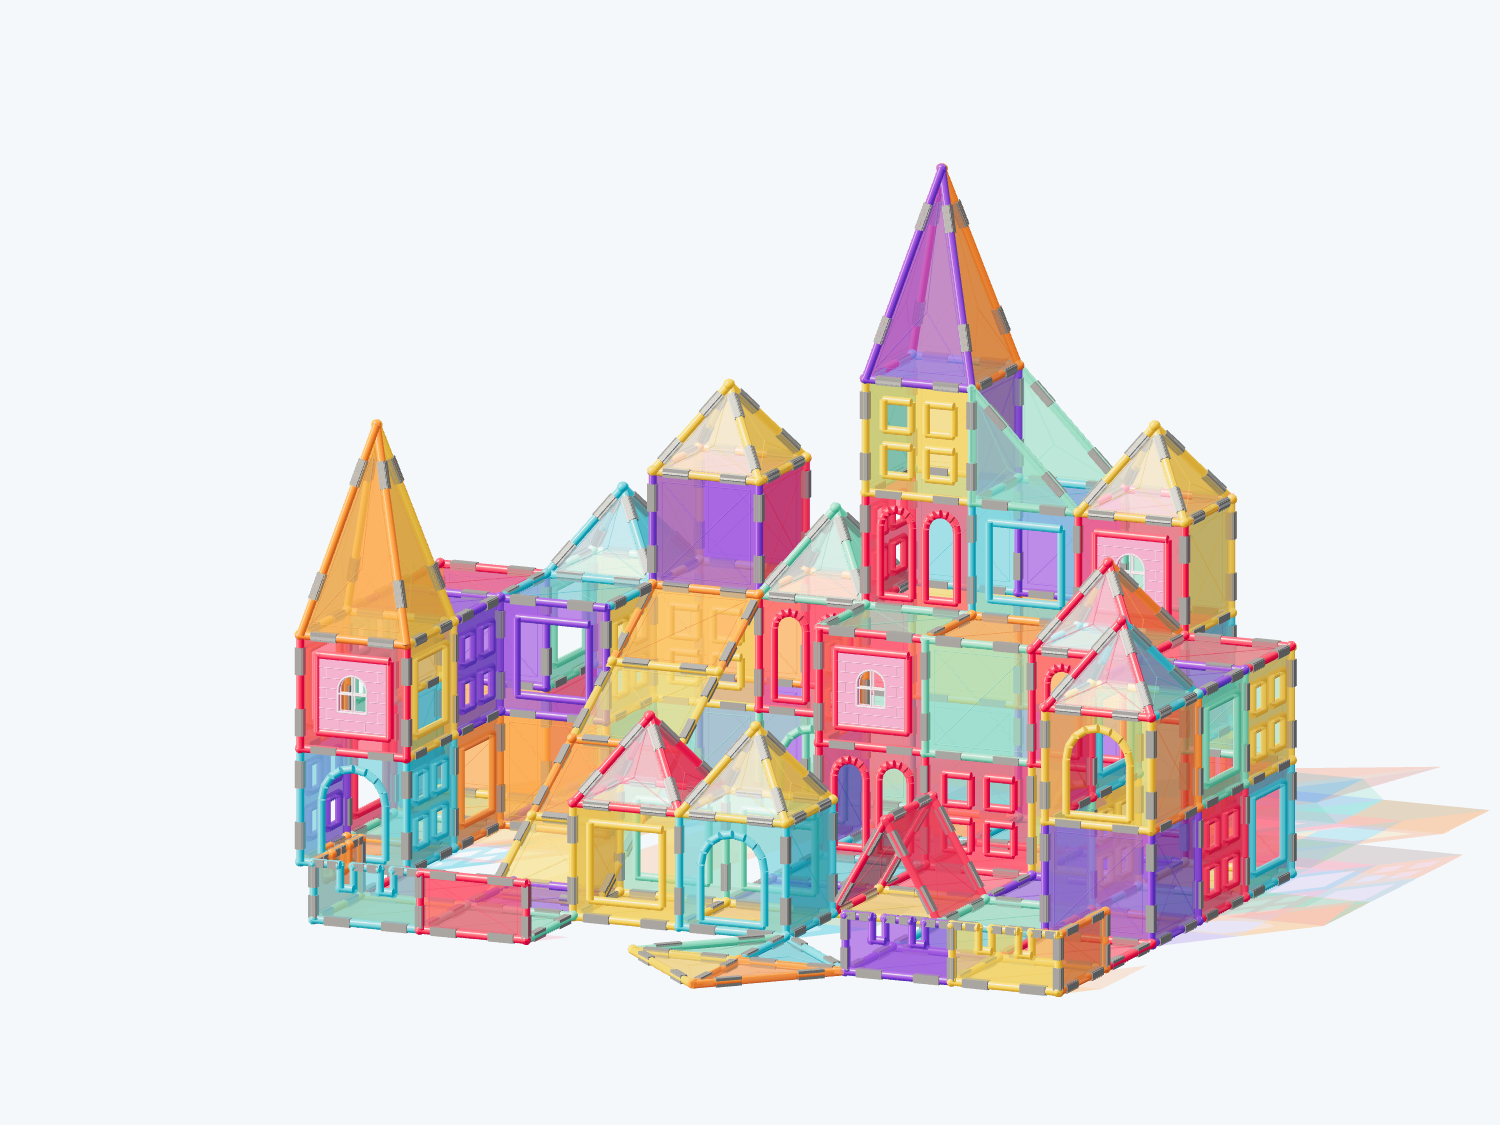
Stained-Glass Spire Castle
189 magnetic tiles + 3 window inserts · 31 steps
Rebuilt from the product hero photo: slender spires, layered windows, a golden ramp and a courtyard
What pieces do you need?
- ×98square tiles
- ×5arch door tiles
- ×14four-pane window tiles
- ×16square frame tiles
- ×4double arch door tiles
- ×8tall triangle tiles
- ×32equilateral triangle tiles
- ×6right triangle tiles
- ×4battlement tiles
- ×2short rectangle tiles (1 × 0.5)
- ×3window inserts (additional)
Compare with your tile set
Choose the exact set to compare quantities. For other brands or mixed boxes, use each plan’s piece list.
Complete photo reconstruction: 189 magnetic tiles plus three window inserts. Extra materials are required; this is not a one-box 104-piece build.
Review the complete castle, then prepare materials by section. Build the central keep, wings and golden ramp before adding the courtyard gatelets and colored plaza.
Before you build with real tiles
- This reconstruction is not limited to one 104-piece package. The materials list counts the complete digital model and may require multiple sets; check the required shapes before quantities.
- Use 189 magnetic tiles plus three nonmagnetic window inserts, for 192 physical components. Clip each pink window insert into its frame; inserts cannot magnetically support other tiles.
- Tall triangles, right triangles, four-pane windows, double arches, frames, half-height short rectangles and low battlements define the silhouette. Digital parts use nominal ratios and may differ from the physical molds and magnet positions.
- Build low sections and closed wall rings first, then place complete four-face caps. An adult must support the long ramp. The digital model does not establish physical holding force, load capacity or stability.
- Rear walls and supports hidden in the photograph have been completed, so the count differs from visible pieces. Build the central keep first, then add the wings and courtyard in later sessions.
How to build it, step by step
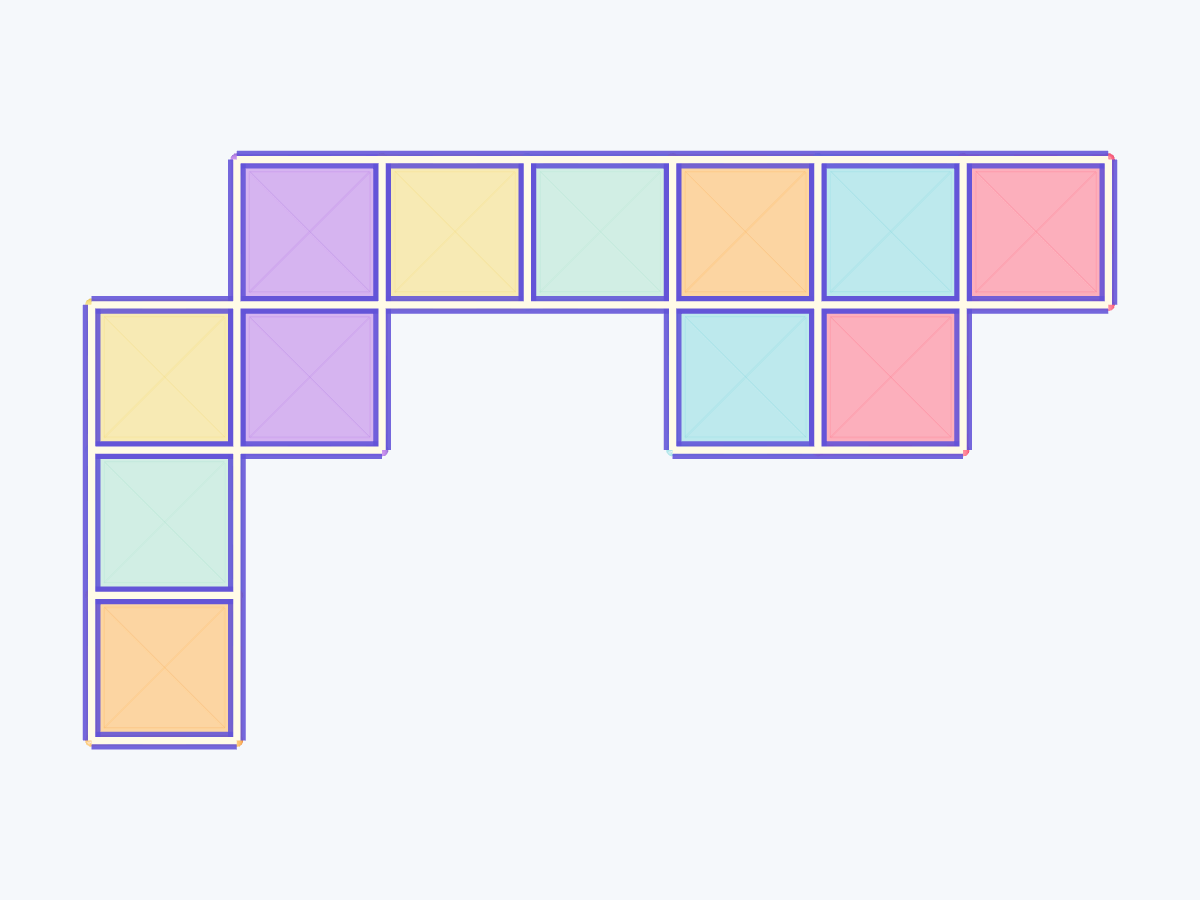
1. Lay out the U-shaped foundation
Add in this step: 12 square tiles
Reserve the back row for the stepped keep. Extend both wings forward and keep the center open for the courtyard.
Hands-on tip: Use a broad level surface; one grid unit is one square tile edge.
Step 1 / 31 2. Lay out the U-shaped foundation
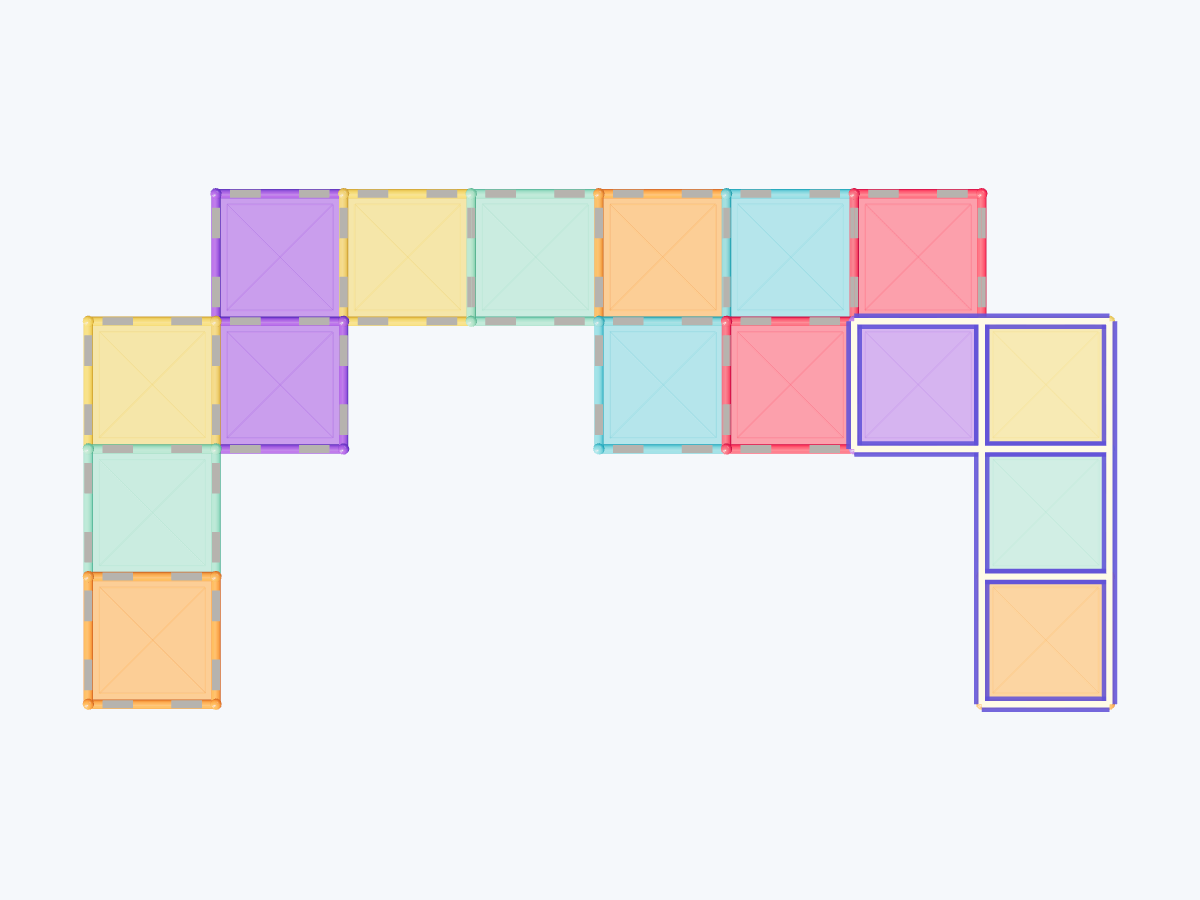
Add in this step: 4 square tiles
Reserve the back row for the stepped keep. Extend both wings forward and keep the center open for the courtyard.
Hands-on tip: Use a broad level surface; one grid unit is one square tile edge.
Step 2 / 31 3. Build storey 1 of the colored walls
Add in this step: 10 square tiles · 1 arch door tiles · 1 four-pane window tiles
Join corners first, then close the outer wall rings. Keep the frames, windows and arches in their visible positions.
Hands-on tip: Align upper wall edges with the walls below; hold each ring until closed.
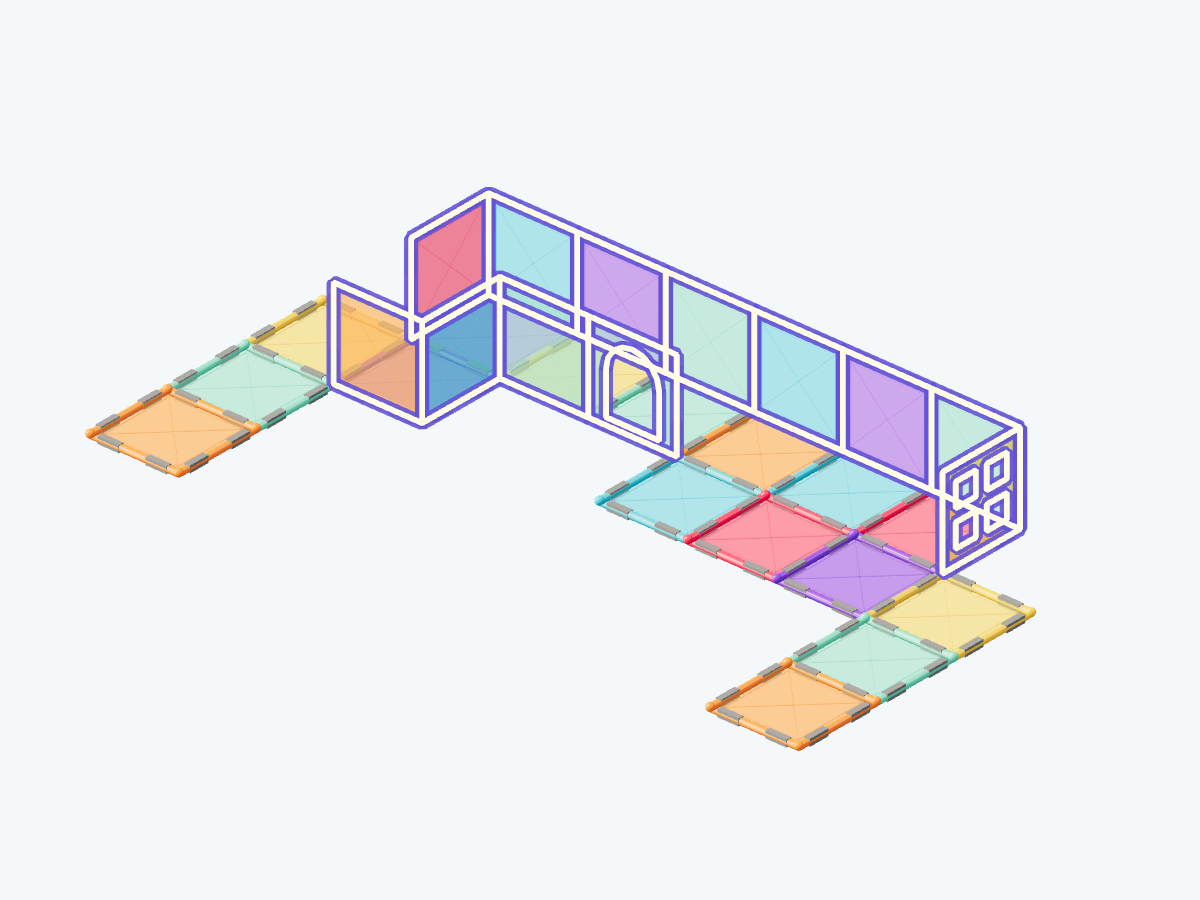
Step 3 / 31 4. Build storey 1 of the colored walls
Add in this step: 3 square tiles · 3 square frame tiles · 2 arch door tiles · 3 four-pane window tiles · 1 double arch door tiles
Join corners first, then close the outer wall rings. Keep the frames, windows and arches in their visible positions.
Hands-on tip: Align upper wall edges with the walls below; hold each ring until closed.
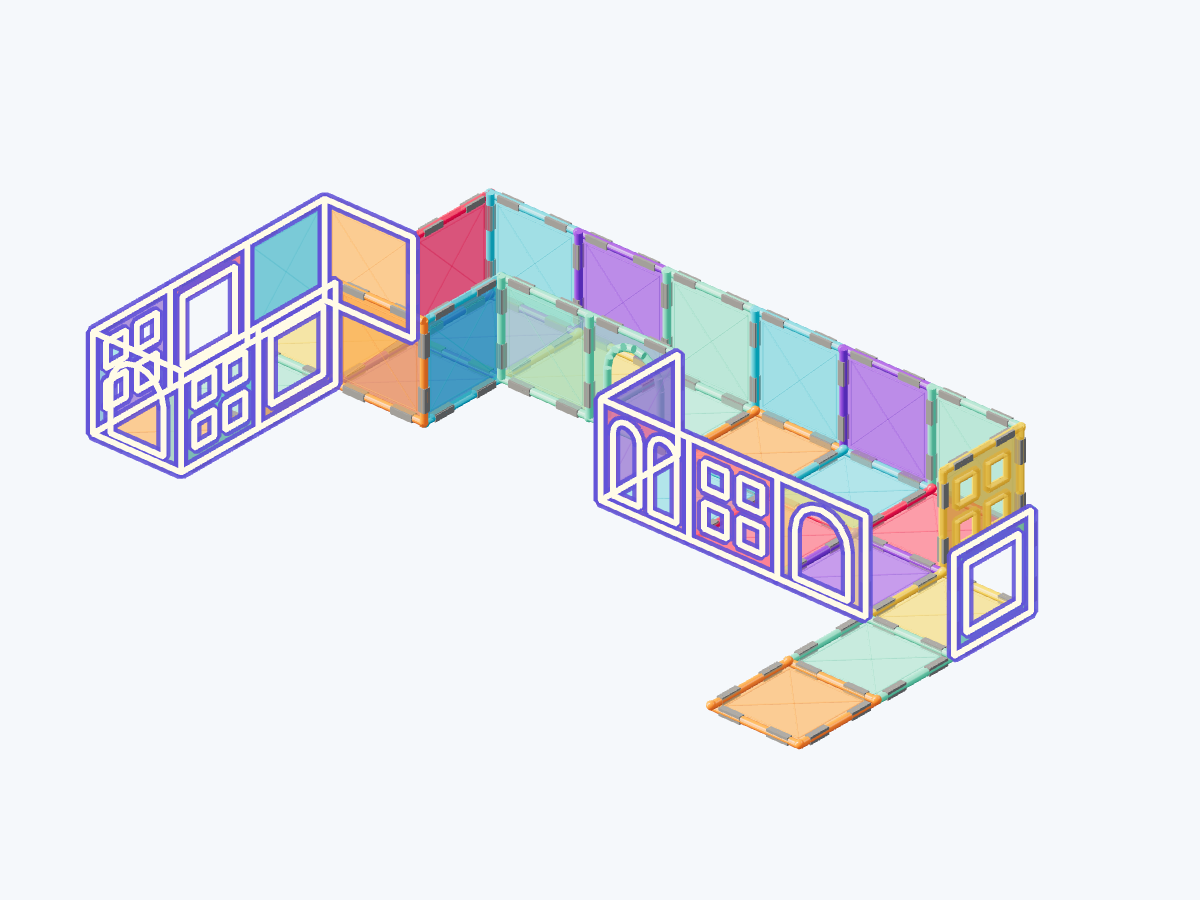
Step 4 / 31 5. Build storey 1 of the colored walls
Add in this step: 4 square tiles · 2 four-pane window tiles
Join corners first, then close the outer wall rings. Keep the frames, windows and arches in their visible positions.
Hands-on tip: Align upper wall edges with the walls below; hold each ring until closed.
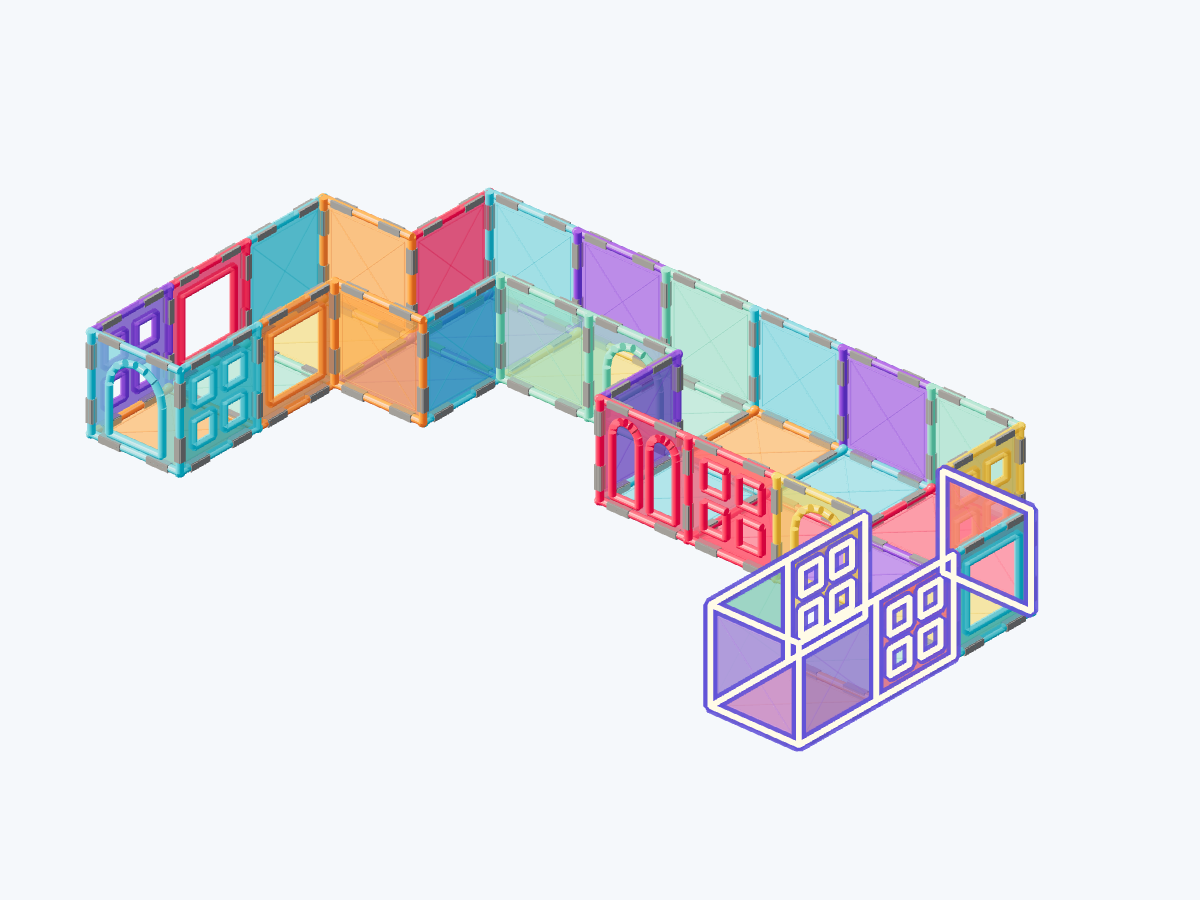
Step 5 / 31 6. Build storey 2 of the colored walls
Add in this step: 7 square tiles · 2 square frame tiles · 2 four-pane window tiles · 1 double arch door tiles
Join corners first, then close the outer wall rings. Keep the frames, windows and arches in their visible positions.
Hands-on tip: Align upper wall edges with the walls below; hold each ring until closed.
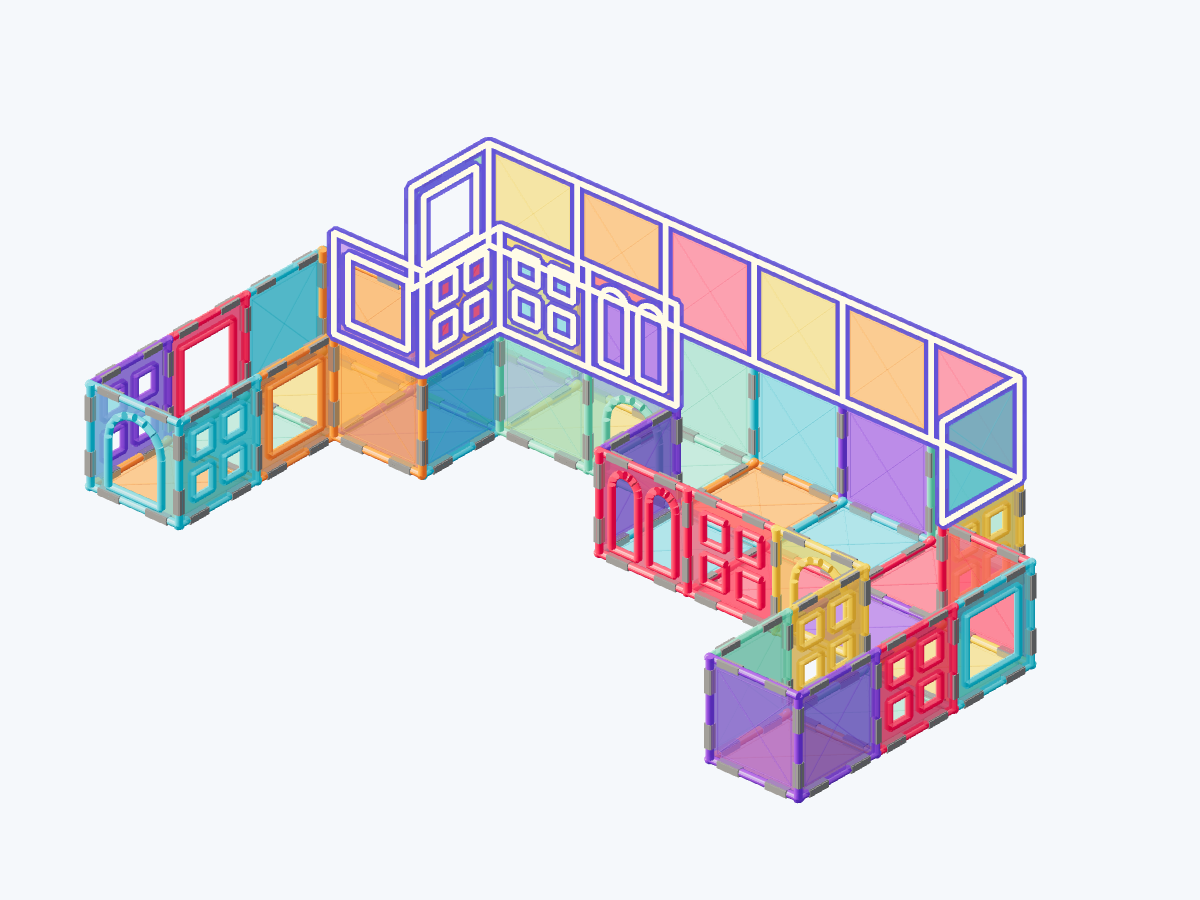
Step 6 / 31 7. Build storey 2 of the colored walls
Add in this step: 3 square tiles · 4 four-pane window tiles · 4 square frame tiles · 1 double arch door tiles · 2 window inserts (additional)
Join corners first, then close the outer wall rings. Keep the frames, windows and arches in their visible positions.
Hands-on tip: Align upper wall edges with the walls below; hold each ring until closed.
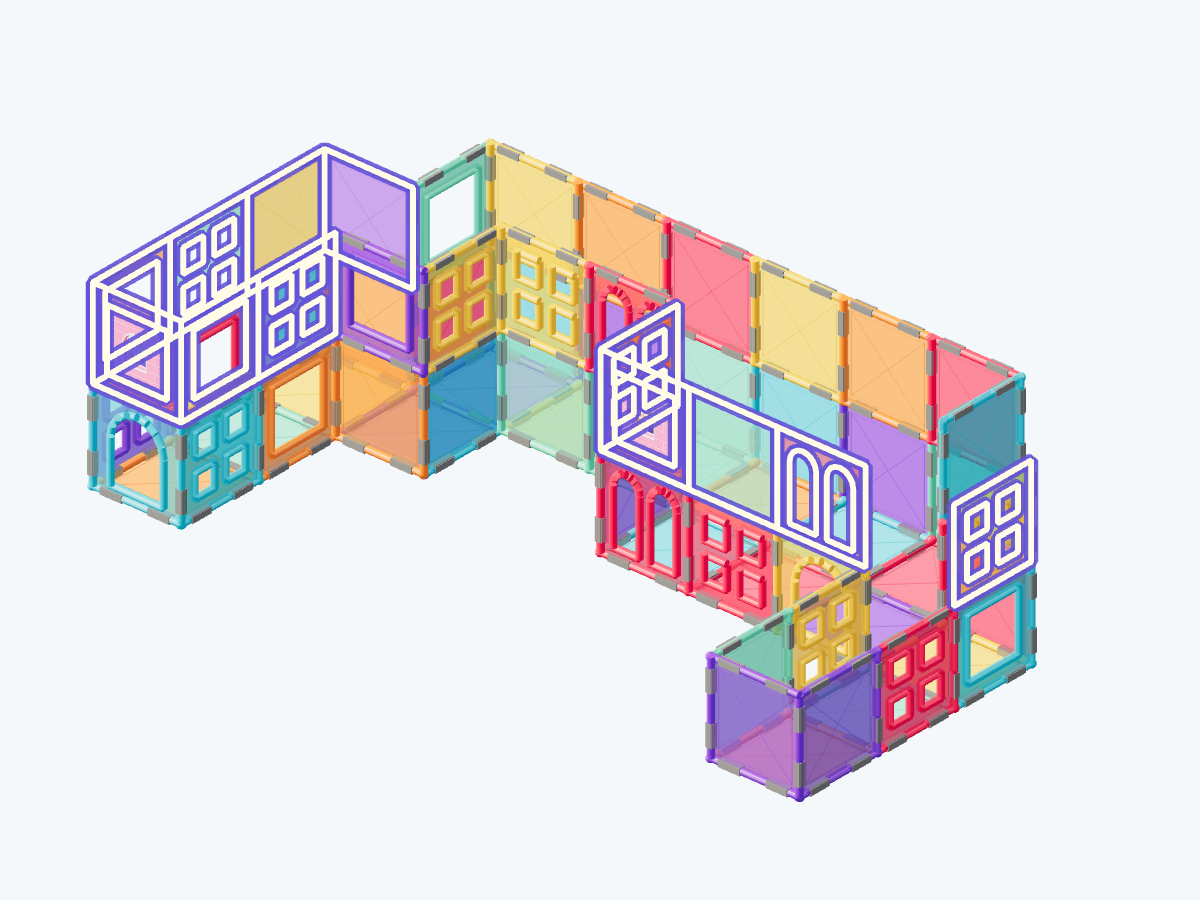
Step 7 / 31 8. Build storey 2 of the colored walls
Add in this step: 3 square tiles · 2 square frame tiles · 1 arch door tiles
Join corners first, then close the outer wall rings. Keep the frames, windows and arches in their visible positions.
Hands-on tip: Align upper wall edges with the walls below; hold each ring until closed.
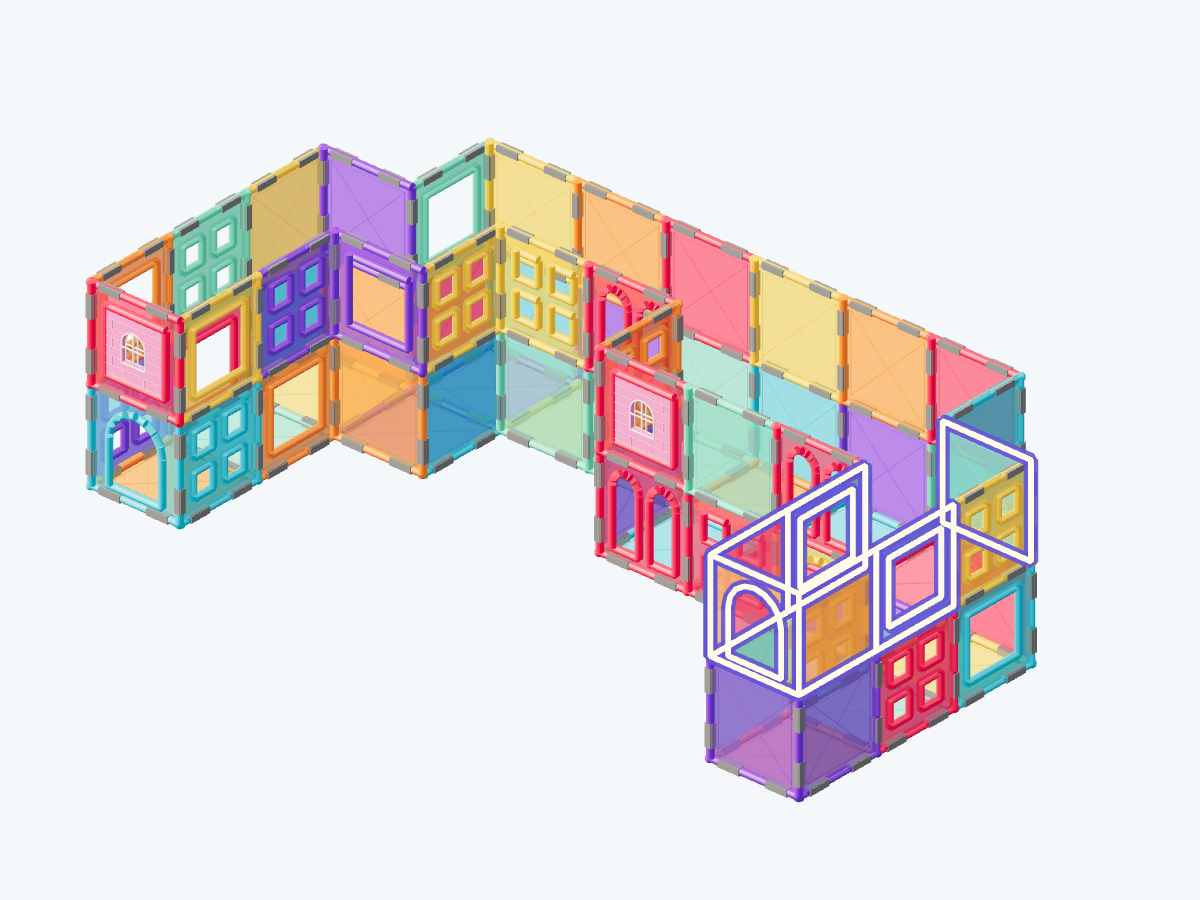
Step 8 / 31 9. Close the terraces at level 2
Add in this step: 12 square tiles
Roof only the sections that have reached their height. Taller sections continue upward without filling each intermediate level.
Hands-on tip: Align roof edges with wall edges and lower gently without pressing.
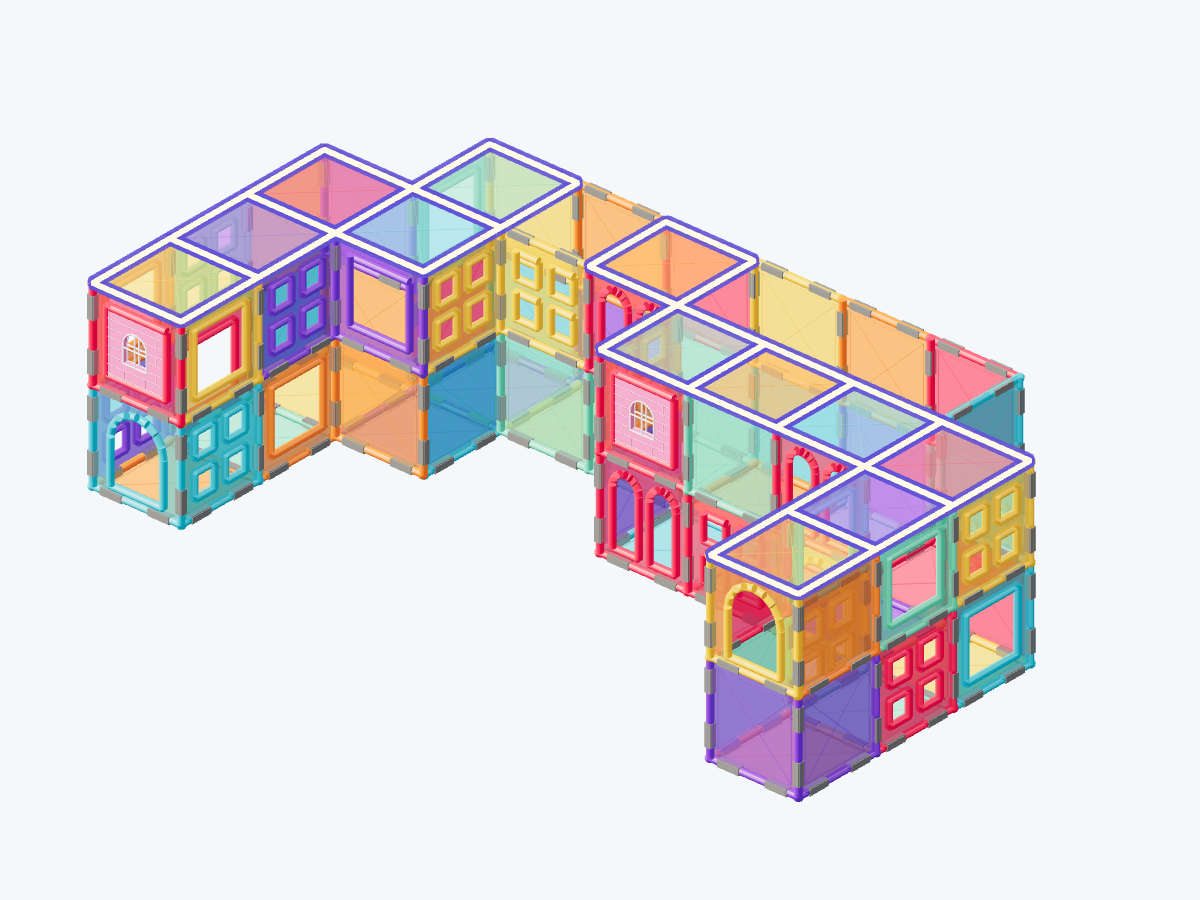
Step 9 / 31 10. Build storey 3 of the colored walls
Add in this step: 8 square tiles · 1 double arch door tiles · 1 four-pane window tiles · 2 square frame tiles · 1 window inserts (additional)
Join corners first, then close the outer wall rings. Keep the frames, windows and arches in their visible positions.
Hands-on tip: Align upper wall edges with the walls below; hold each ring until closed.
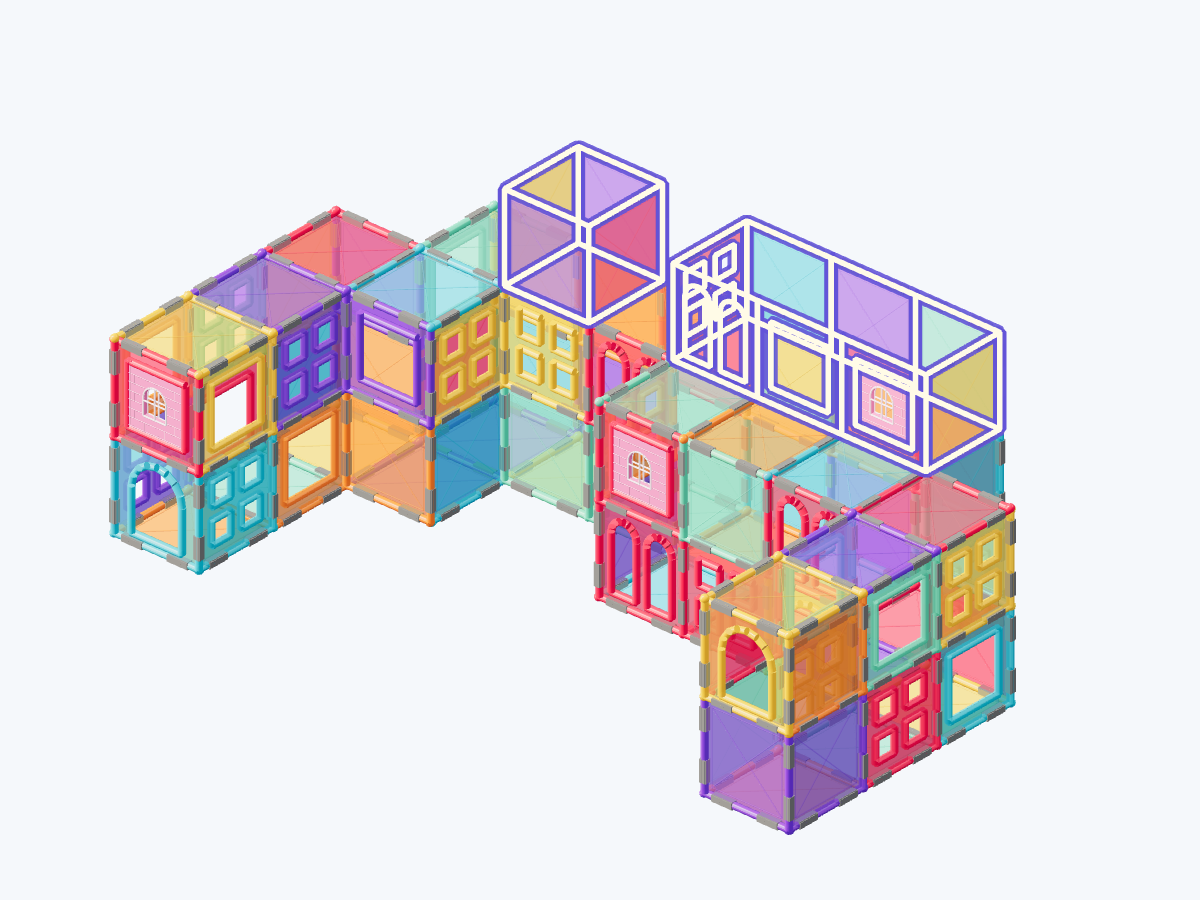
Step 10 / 31 11. Close the terraces at level 3
Add in this step: 3 square tiles
Roof only the sections that have reached their height. Taller sections continue upward without filling each intermediate level.
Hands-on tip: Align roof edges with wall edges and lower gently without pressing.
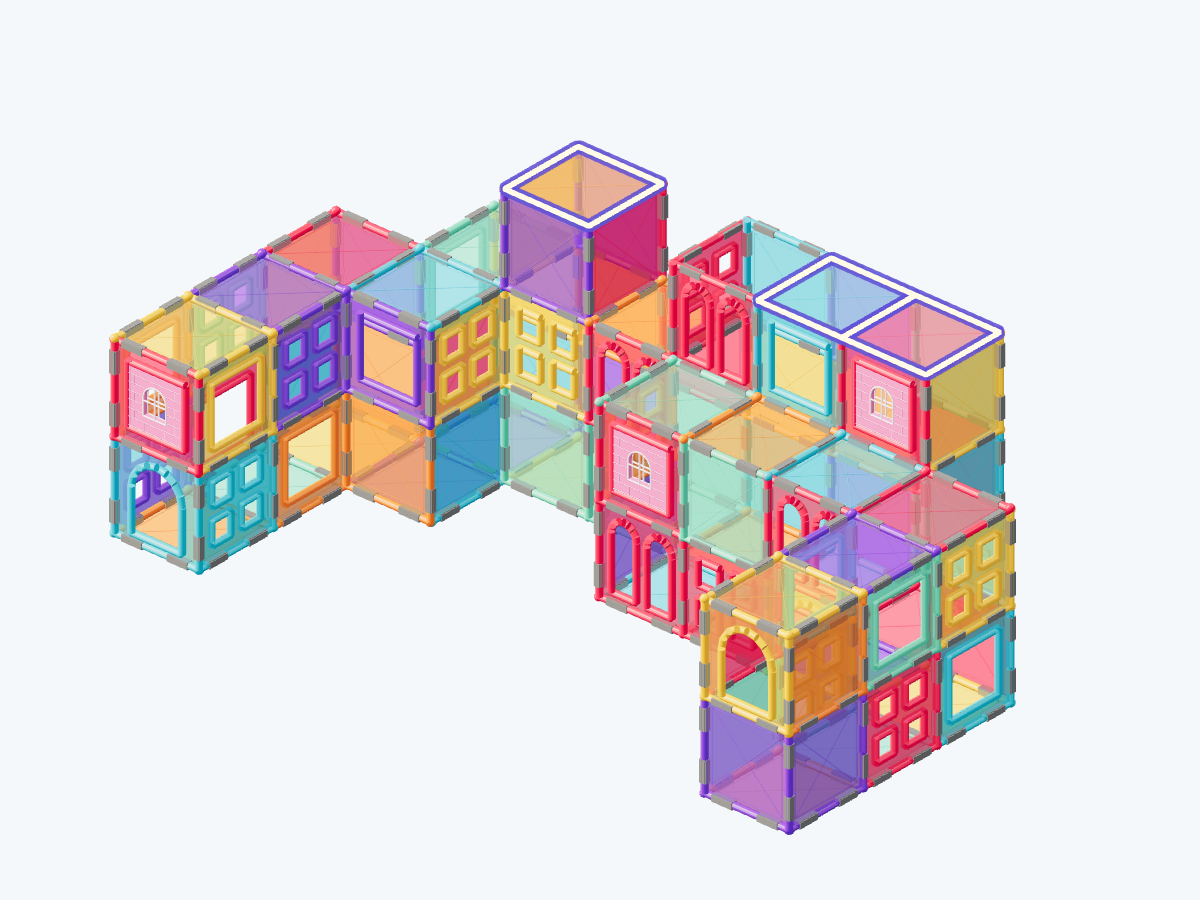
Step 11 / 31 12. Build storey 4 of the colored walls
Add in this step: 1 four-pane window tiles · 3 square tiles
Join corners first, then close the outer wall rings. Keep the frames, windows and arches in their visible positions.
Hands-on tip: Align upper wall edges with the walls below; hold each ring until closed.
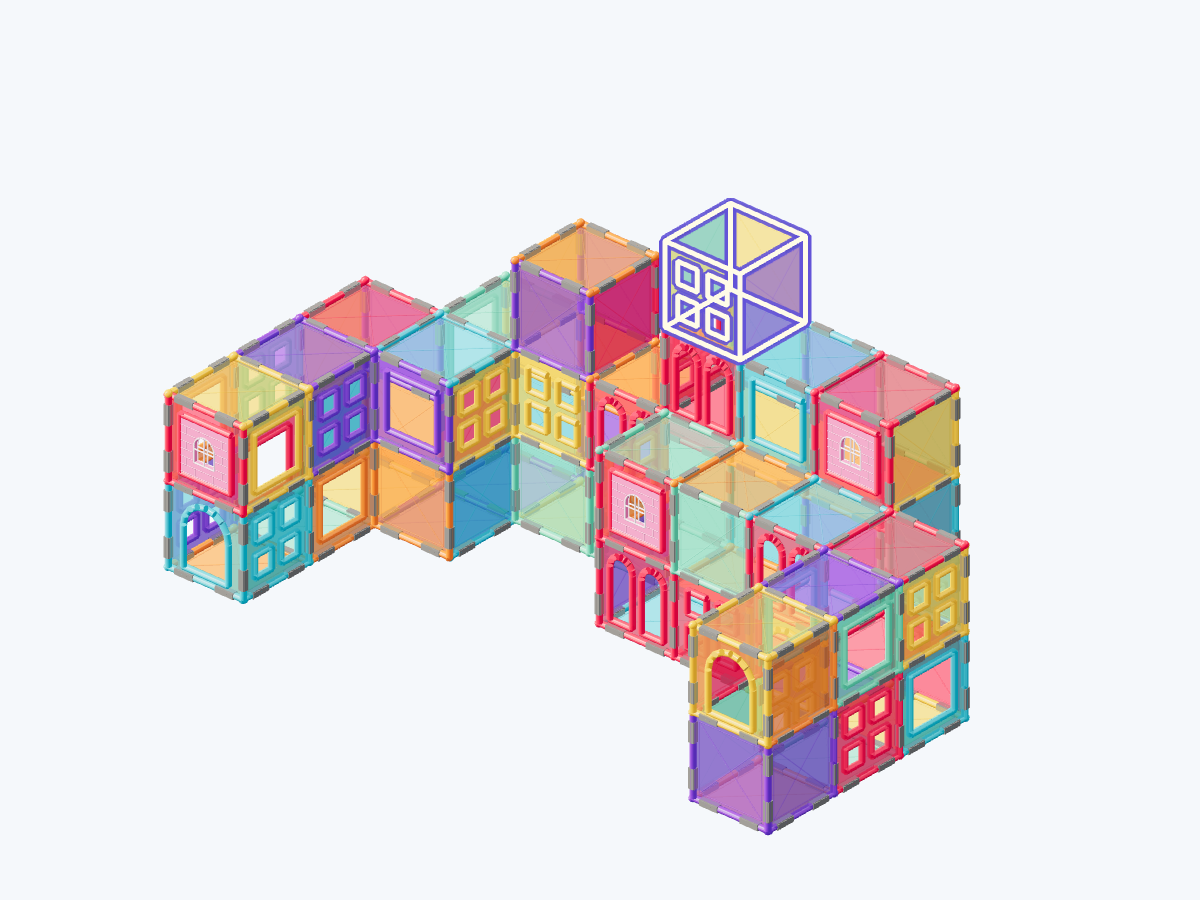
Step 12 / 31 13. Close the terraces at level 4
Add in this step: 1 square tiles
Roof only the sections that have reached their height. Taller sections continue upward without filling each intermediate level.
Hands-on tip: Align roof edges with wall edges and lower gently without pressing.
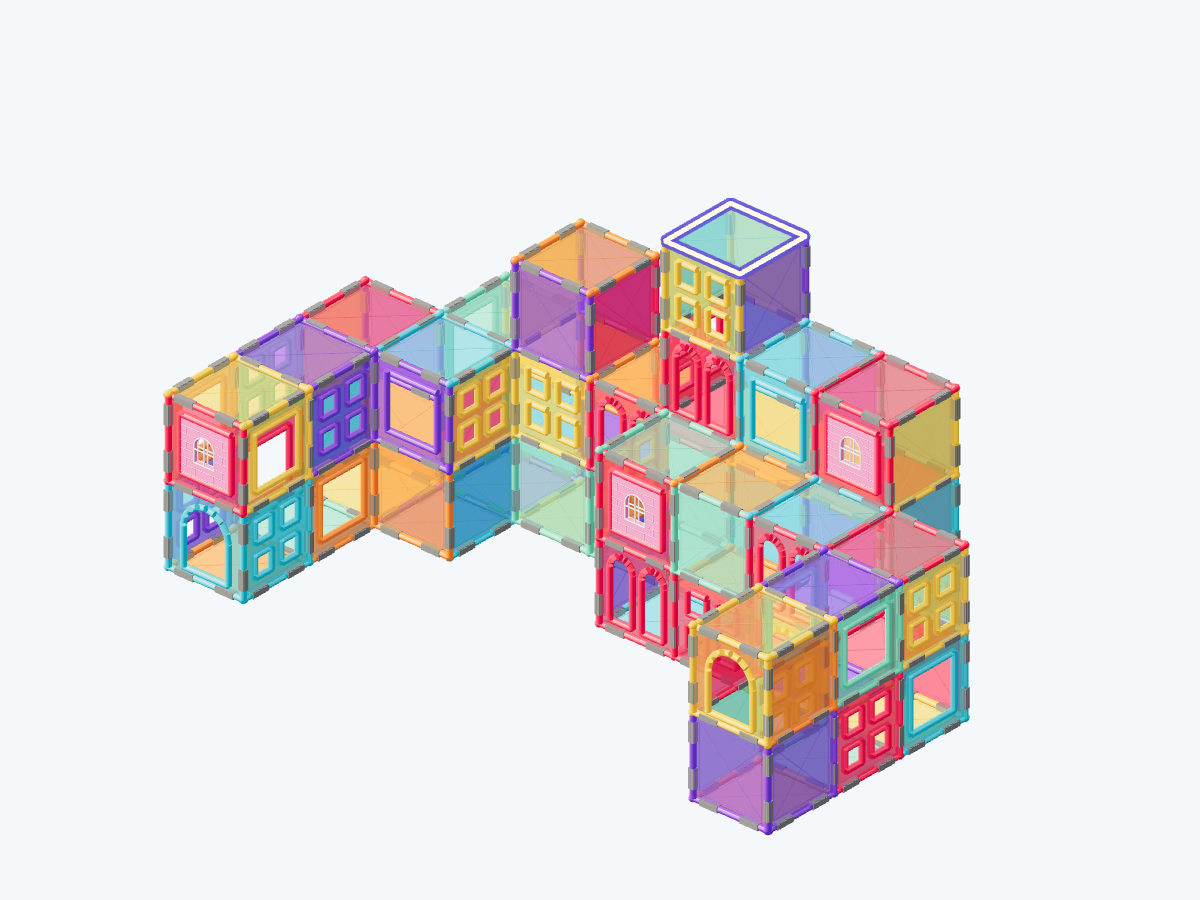
Step 13 / 31 14. Crown the keep with its tall spire
Add in this step: 4 tall triangle tiles
Join four tall triangles into the slender central spire, with purple at the front and orange at the side.
Hands-on tip: Connect all four base edges and close every sloping seam while an adult supports it.
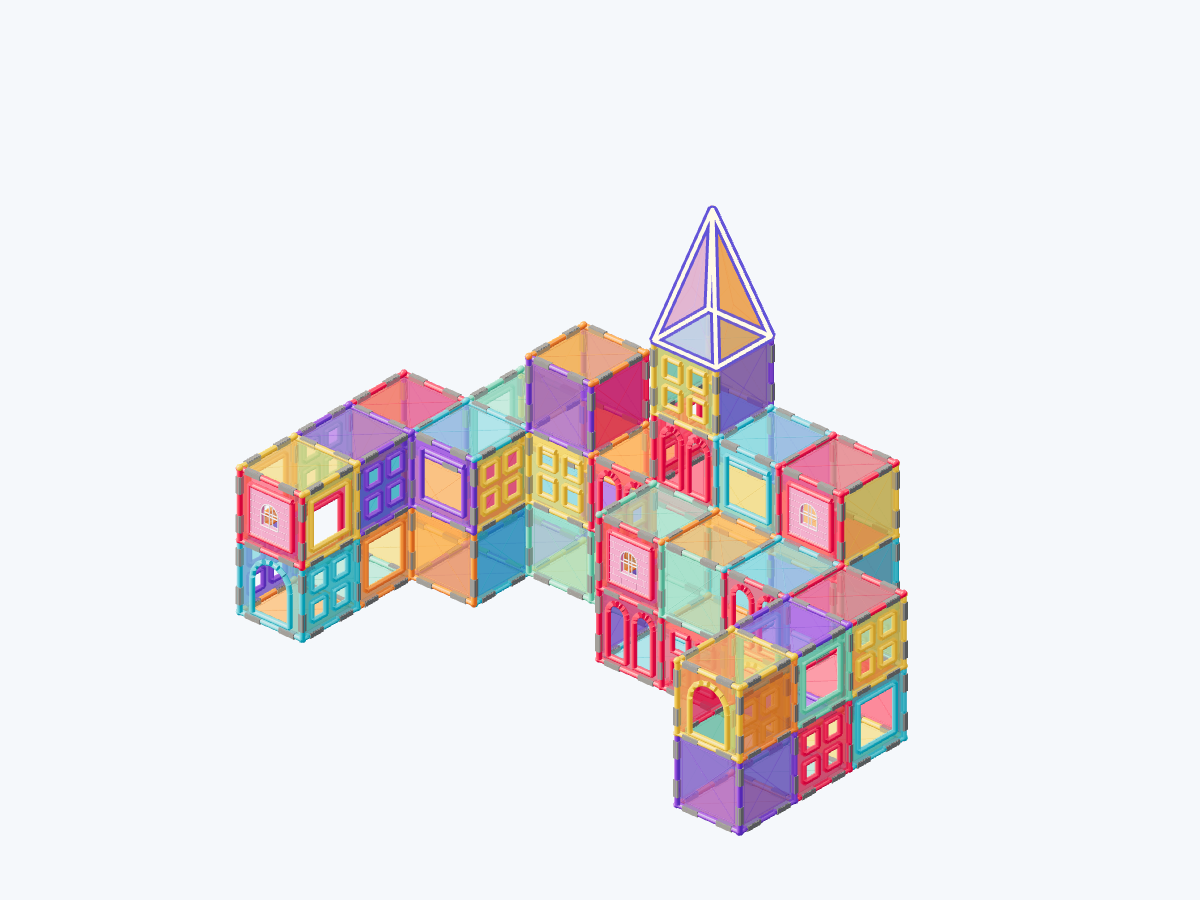
Step 14 / 31 15. Add the tall orange left spire
Add in this step: 4 tall triangle tiles
Place a second slender cap on the front of the left wing, below the central spire.
Hands-on tip: Join a closed four-face cap before placing it; never leave one or two tall triangles standing alone.

Step 15 / 31 16. Place colorful small spire 1
Add in this step: 4 equilateral triangle tiles
Join four ordinary triangles into a complete cap, then place it on the matching tower.
Hands-on tip: Close all four cap faces before setting the cap onto the tower walls.
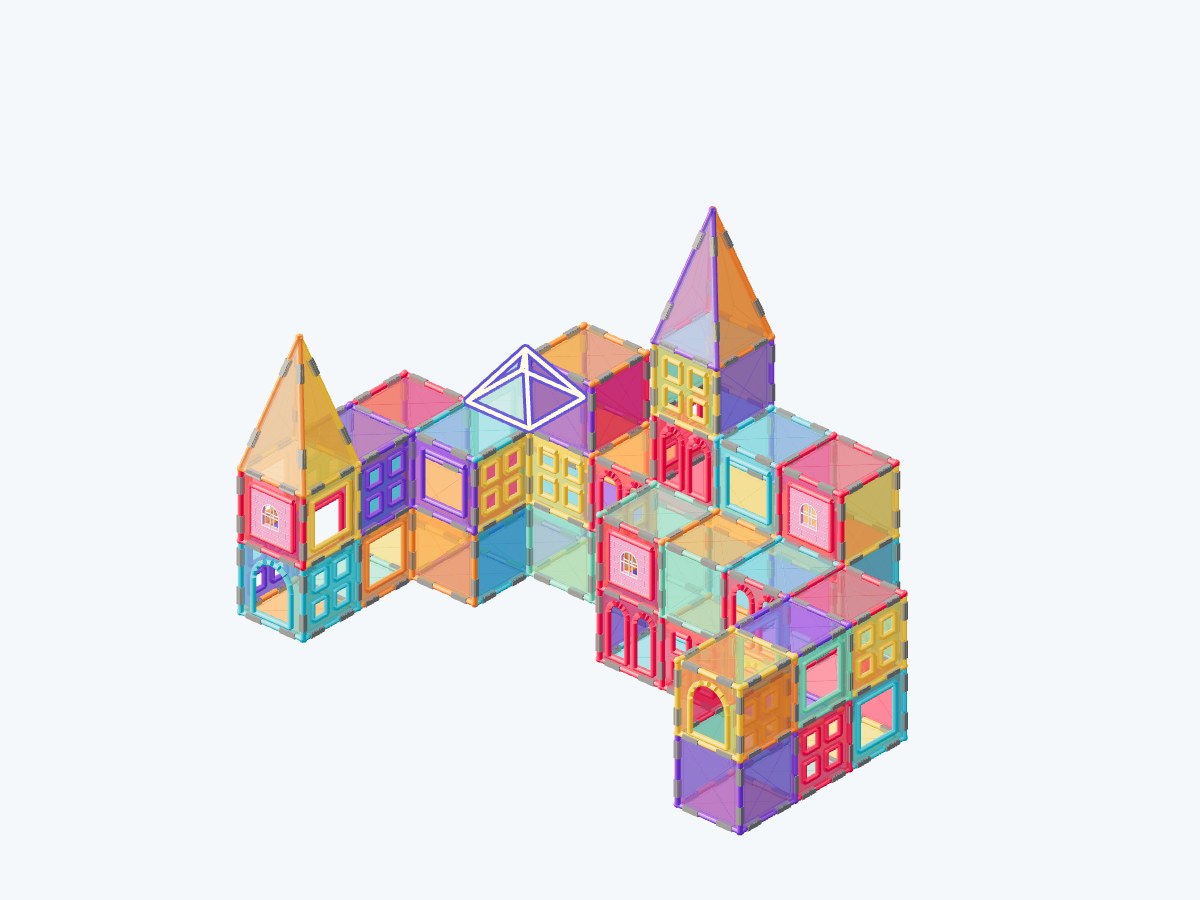
Step 16 / 31 17. Place colorful small spire 2
Add in this step: 4 equilateral triangle tiles
Join four ordinary triangles into a complete cap, then place it on the matching tower.
Hands-on tip: Close all four cap faces before setting the cap onto the tower walls.
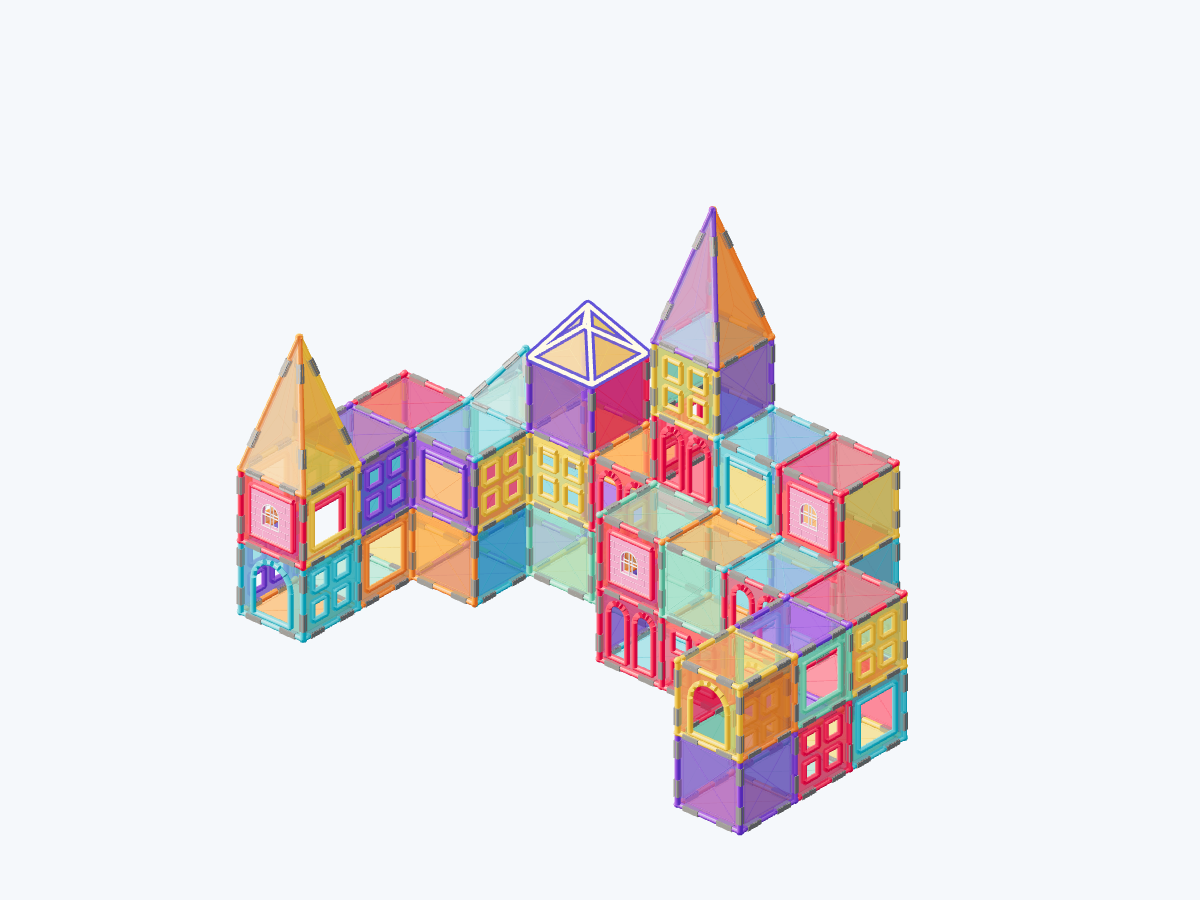
Step 17 / 31 18. Place colorful small spire 3
Add in this step: 4 equilateral triangle tiles
Join four ordinary triangles into a complete cap, then place it on the matching tower.
Hands-on tip: Close all four cap faces before setting the cap onto the tower walls.
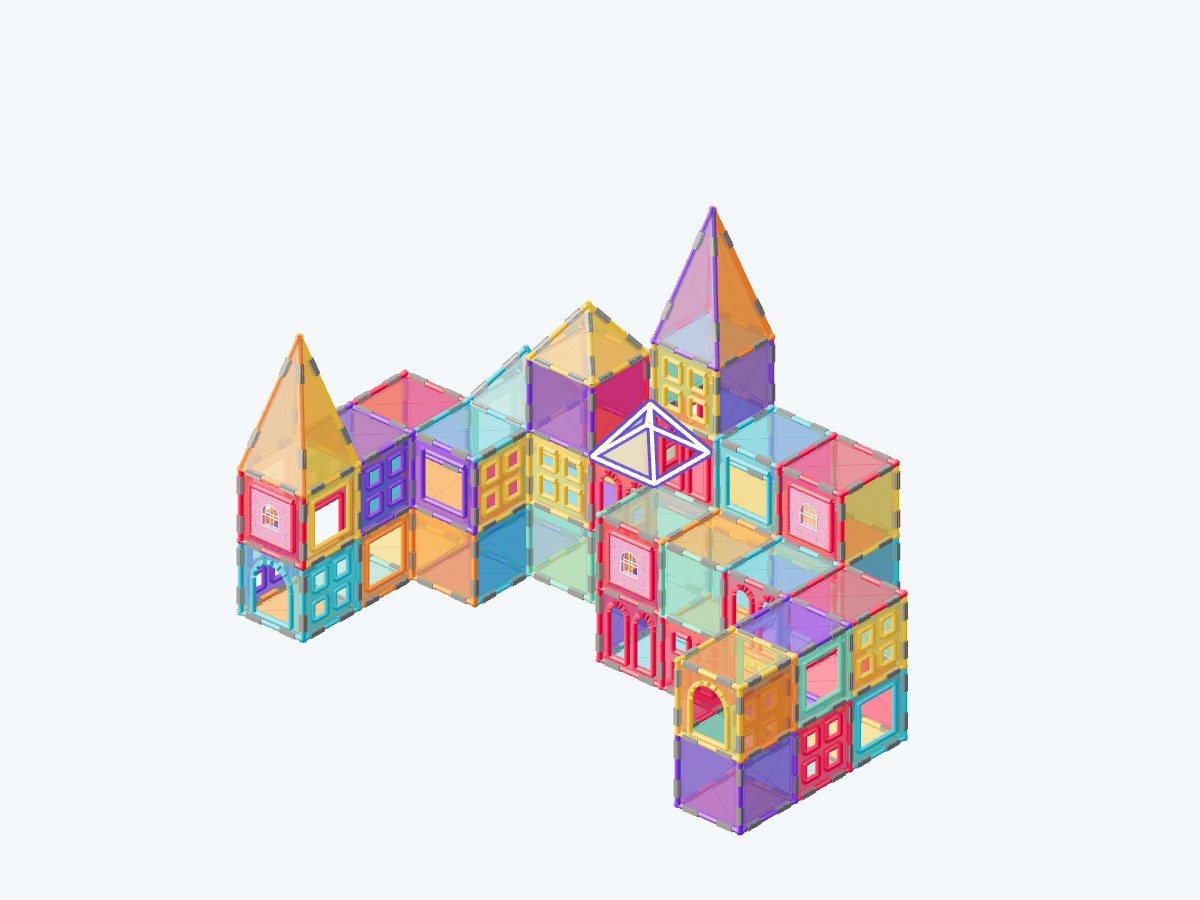
Step 18 / 31 19. Place colorful small spire 4
Add in this step: 4 equilateral triangle tiles
Join four ordinary triangles into a complete cap, then place it on the matching tower.
Hands-on tip: Close all four cap faces before setting the cap onto the tower walls.
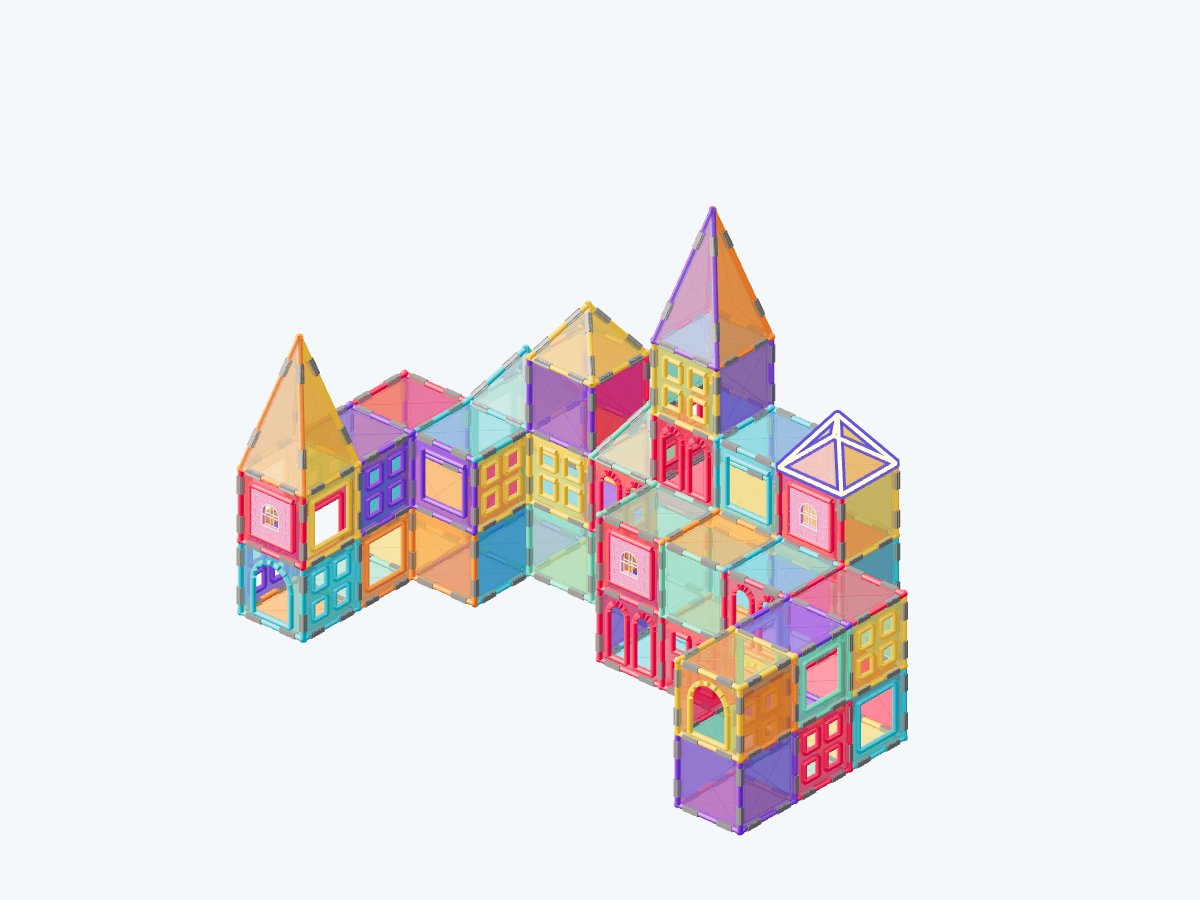
Step 19 / 31 20. Place colorful small spire 5
Add in this step: 4 equilateral triangle tiles
Join four ordinary triangles into a complete cap, then place it on the matching tower.
Hands-on tip: Close all four cap faces before setting the cap onto the tower walls.

Step 20 / 31 21. Place colorful small spire 6
Add in this step: 4 equilateral triangle tiles
Join four ordinary triangles into a complete cap, then place it on the matching tower.
Hands-on tip: Close all four cap faces before setting the cap onto the tower walls.

Step 21 / 31 22. Add the keep’s descending shoulder
Add in this step: 2 right triangle tiles
Place a right triangle at the front and rear. Join their vertical edges to the tall keep and their bases to the neighboring terrace.
Hands-on tip: Each triangle must join both its base and vertical edge; a base alone is insufficient.
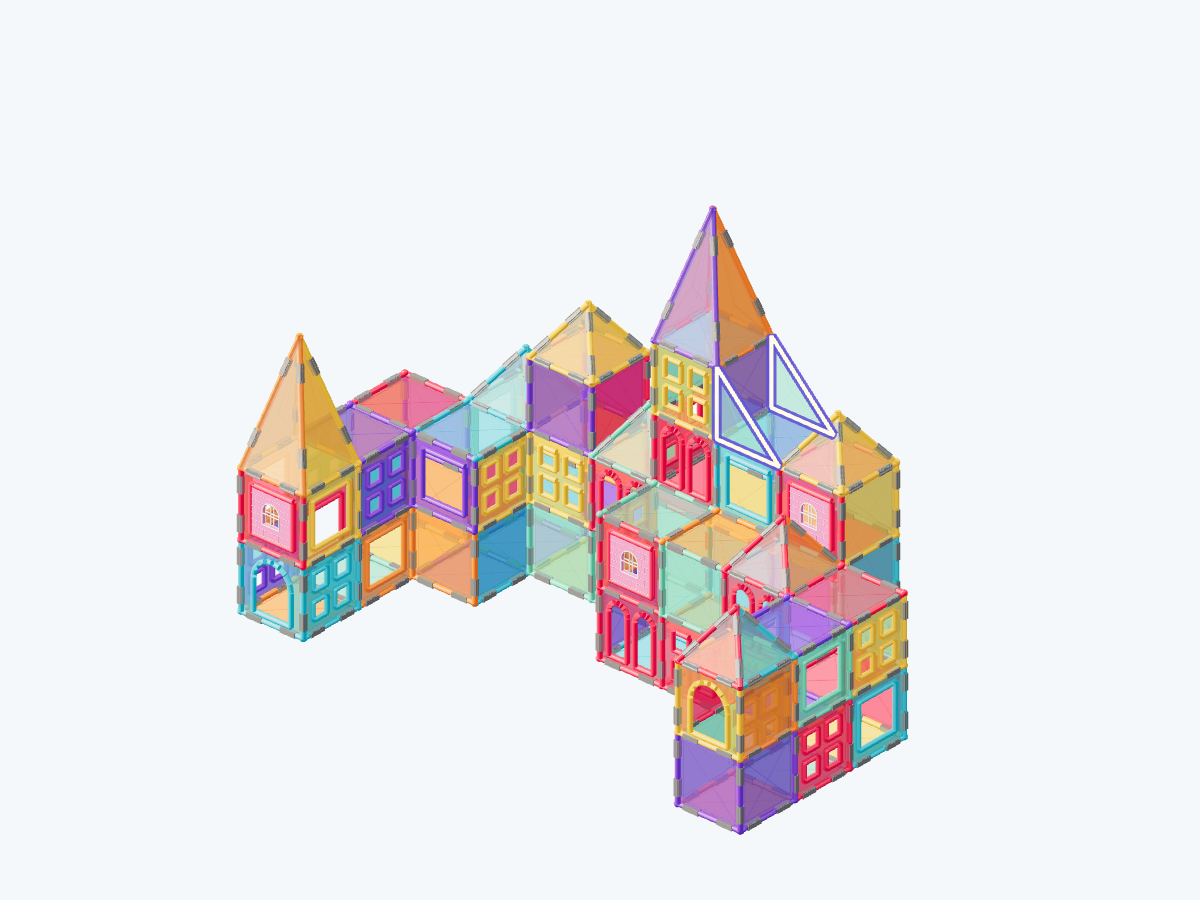
Step 22 / 31 23. Prepare the ramp landing
Add in this step: 1 square tiles
Place a horizontal floor inside the purple left tower at level two, with its front edge flush with the wall.
Hands-on tip: Join the floor edges to the existing wall edges while supporting it.

Step 23 / 31 24. Connect the long golden ramp
Add in this step: 4 square tiles
Join four squares edge to edge from the ground to the second-storey rear terrace. Connect the upper end to a full terrace edge.
Hands-on tip: An adult should hold the middle until both ends are attached. Use temporary support if needed; the ramp is not load-bearing.
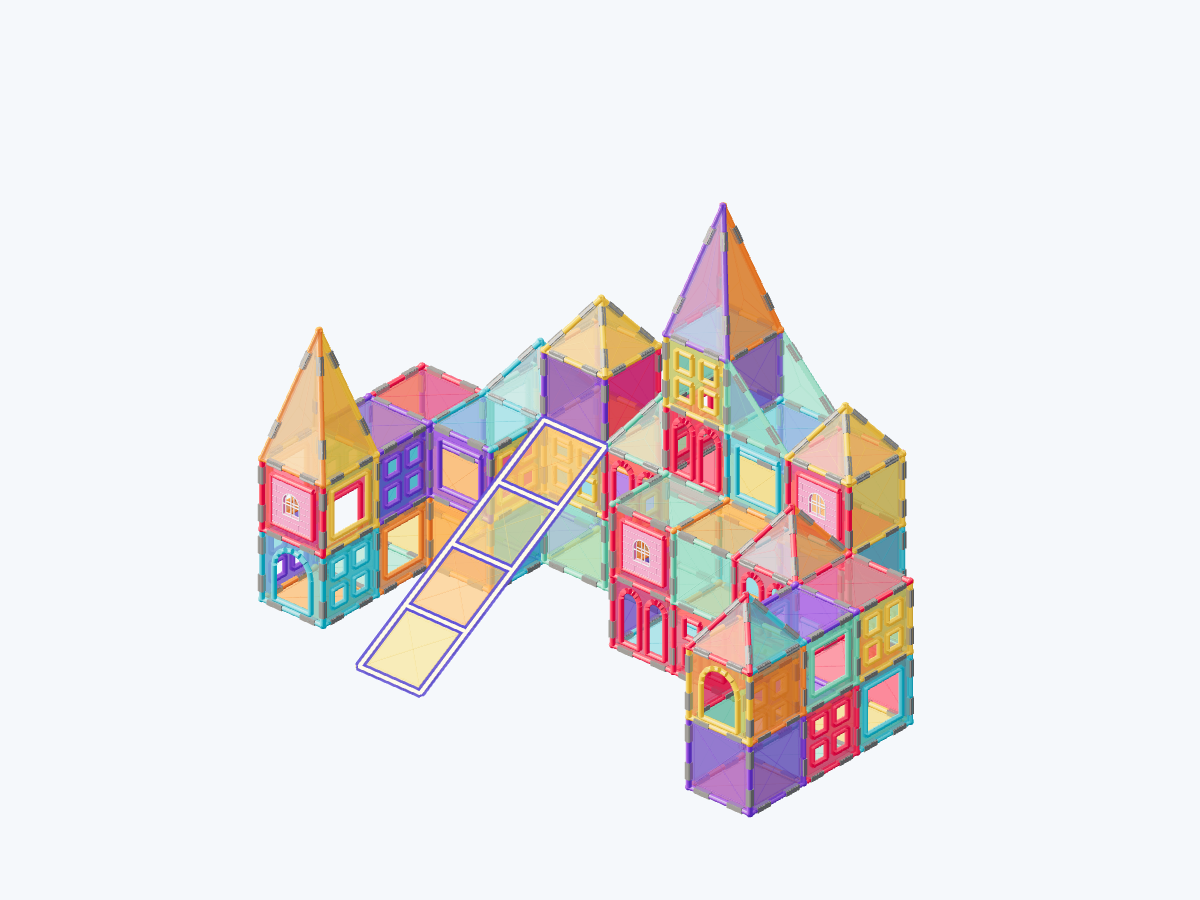
Step 24 / 31 25. Lay out the colorful courtyard
Add in this step: 12 square tiles
Spread colored floor tiles in front of the keep and leave space for the ramp and small gate.
Hands-on tip: Do not stack ground tiles onto the ramp or duplicate existing foundation tiles.
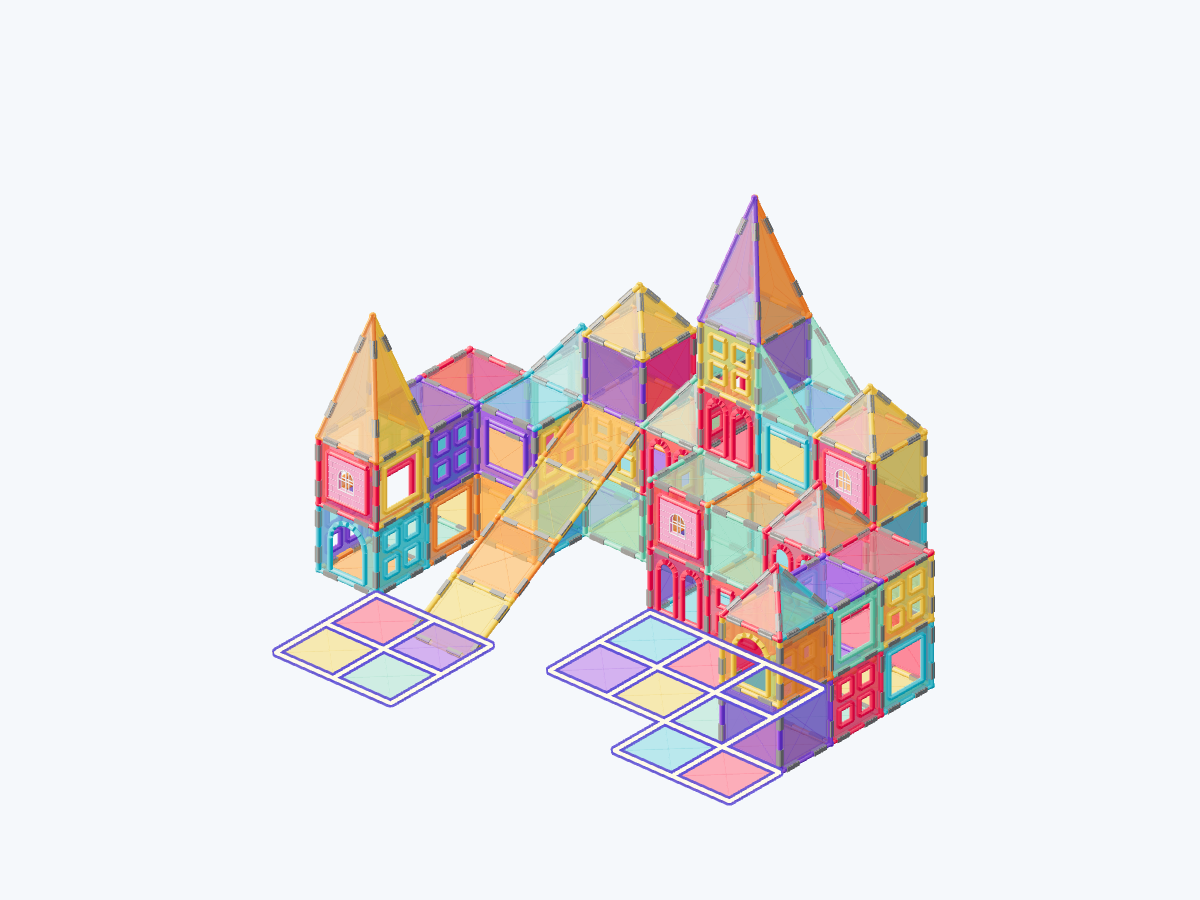
Step 25 / 31 26. Lay out the colorful courtyard
Add in this step: 2 square tiles
Spread colored floor tiles in front of the keep and leave space for the ramp and small gate.
Hands-on tip: Do not stack ground tiles onto the ramp or duplicate existing foundation tiles.
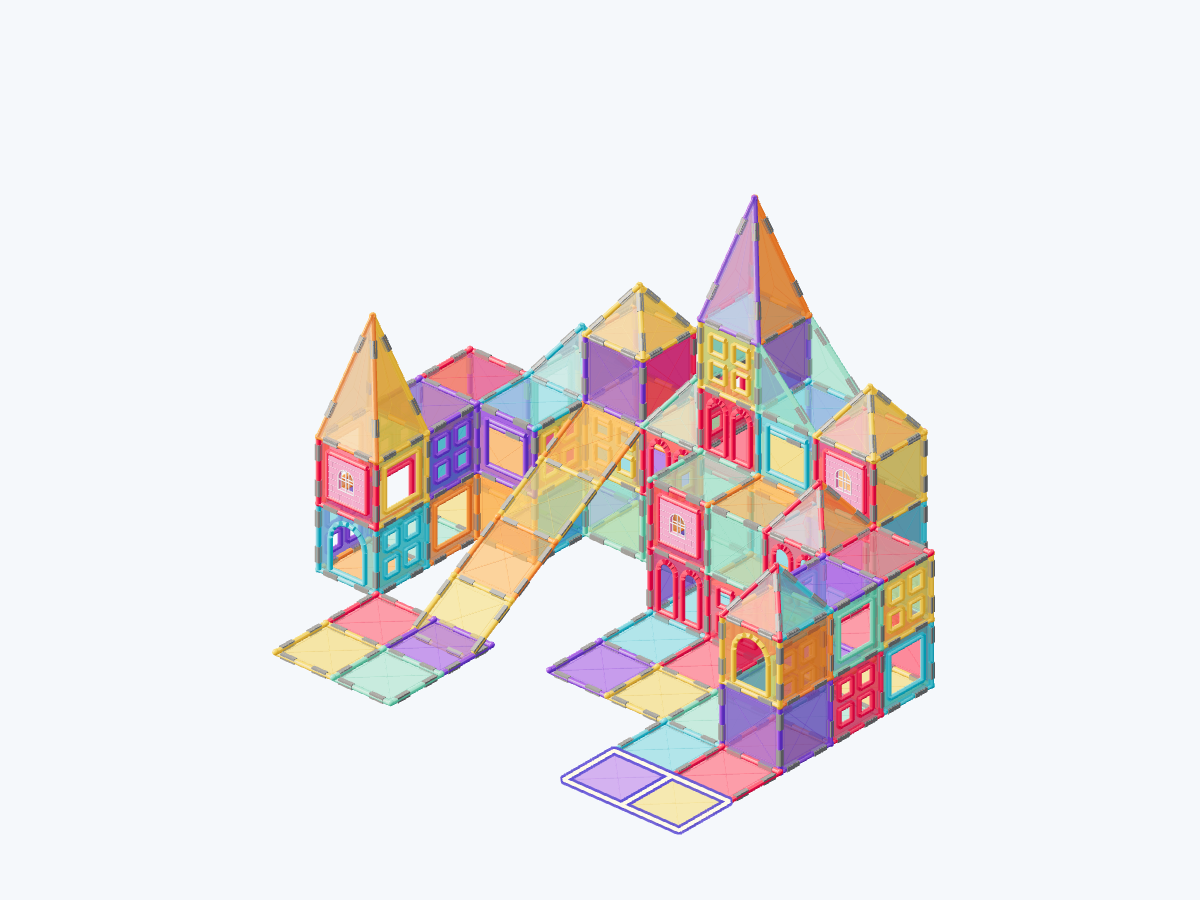
Step 26 / 31 27. Build the pair of courtyard gatelets
Add in this step: 4 square tiles · 3 square frame tiles · 1 arch door tiles
Place a yellow frame beside a blue arch in the courtyard. Close the outer sides and backs so the pair stands as a connected enclosure.
Hands-on tip: Join the side and rear walls before releasing the front frames.
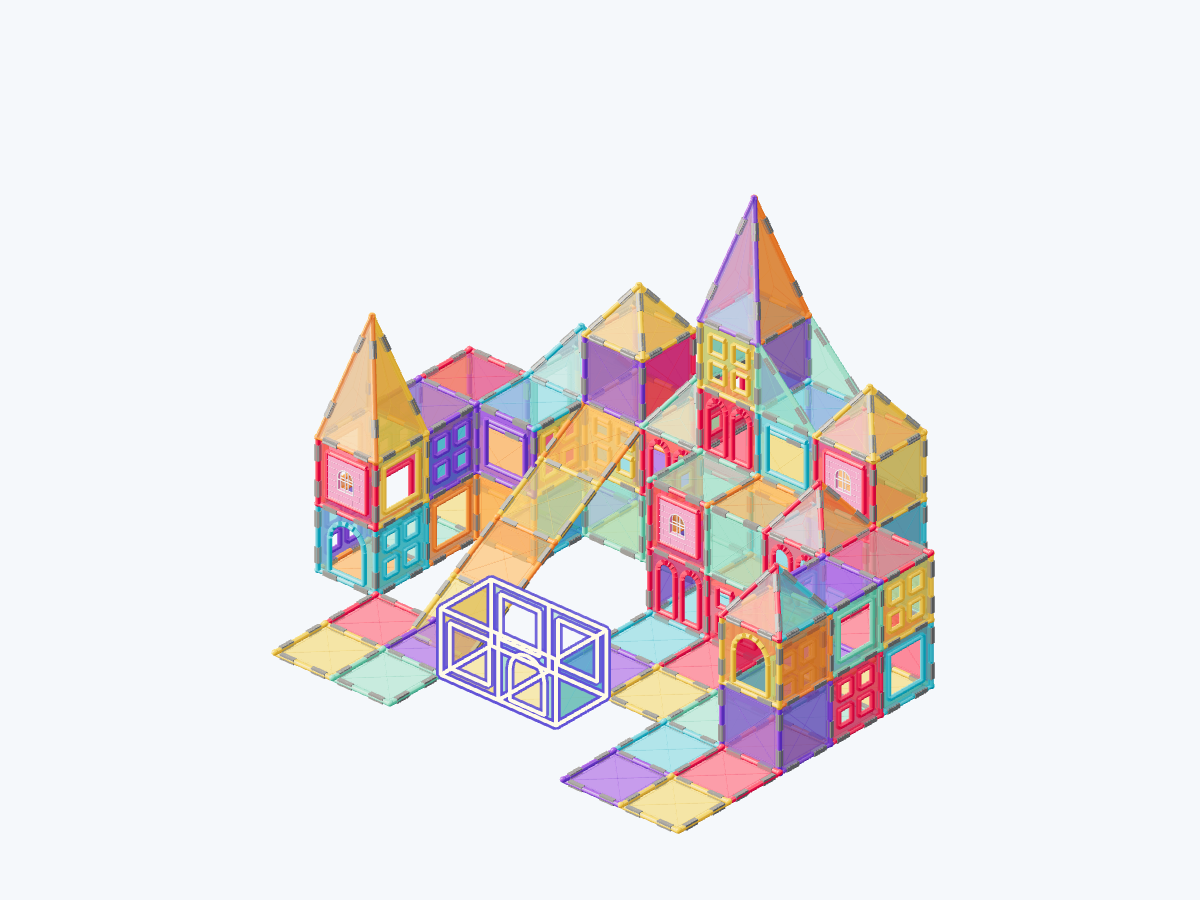
Step 27 / 31 28. Cap the gatelets in red and gold
Add in this step: 8 equilateral triangle tiles
Make one four-triangle red cap and one gold cap. Preserve the low-front, tall-back composition.
Hands-on tip: Assemble each complete four-face cap before an adult places it.
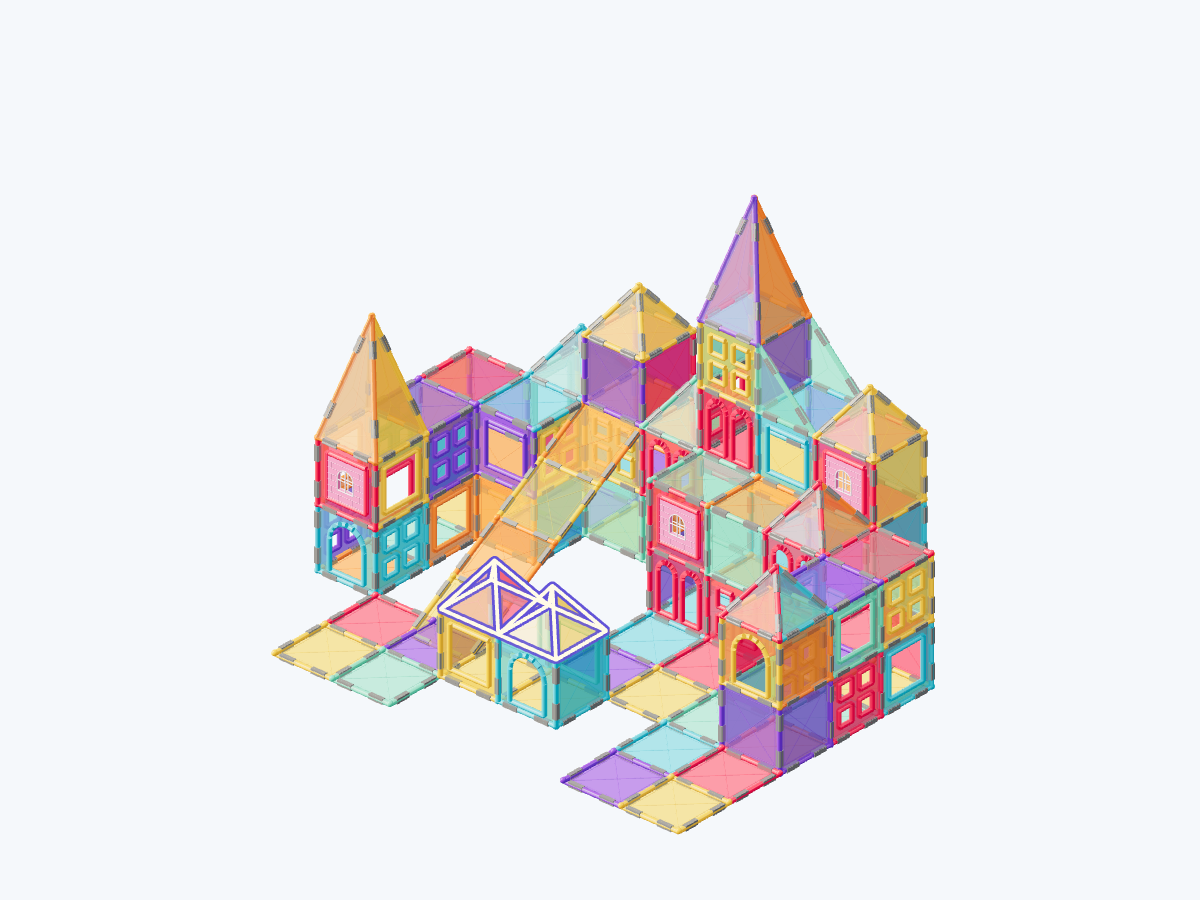
Step 28 / 31 29. Add an open A-frame to the right courtyard
Add in this step: 2 square tiles
Lean two pink squares inward and join their upper edges at the ridge. Keep both ends open.
Hands-on tip: Join both lower edges to the existing floor and close the entire ridge while holding both slopes.
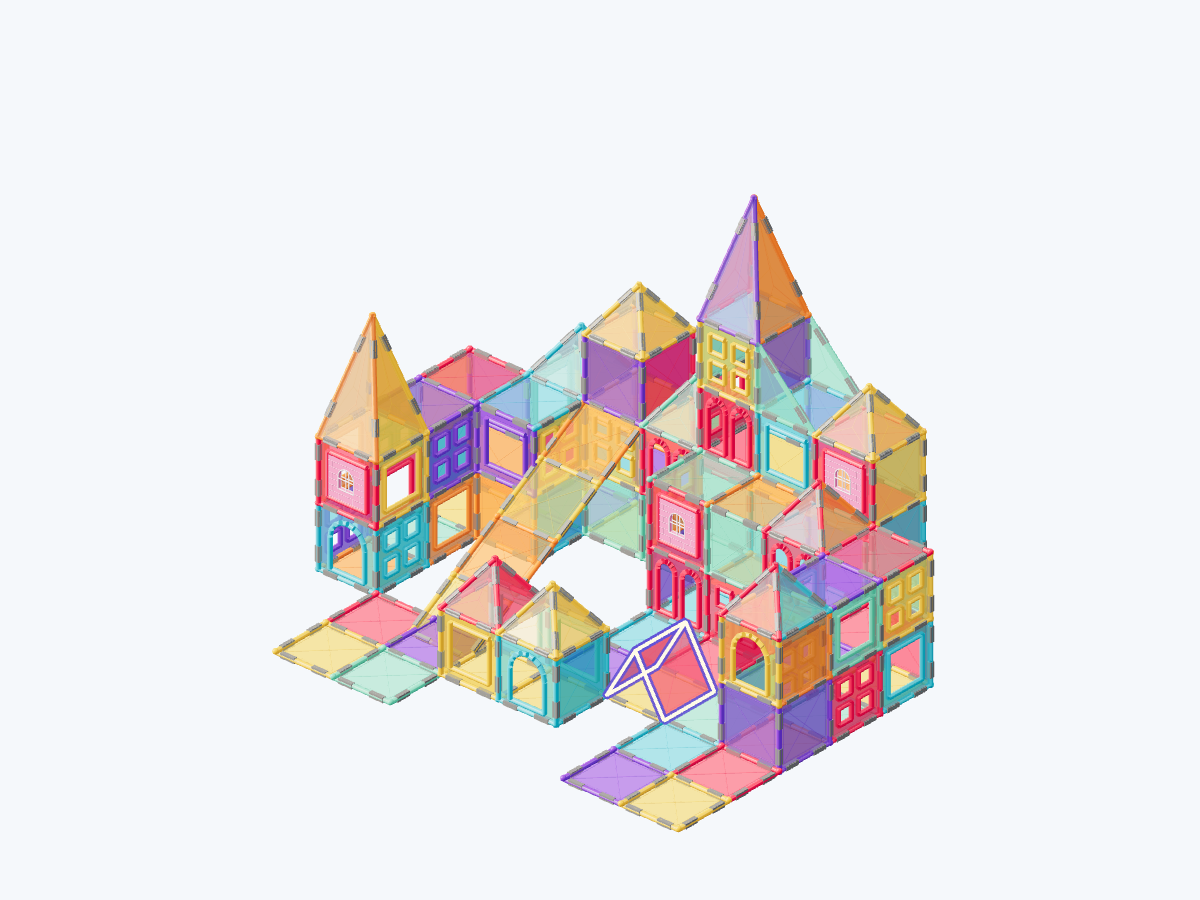
Step 29 / 31 30. Make the colored courtyard diamond
Add in this step: 4 right triangle tiles
Bring the right-angle corners of four triangles together. Blue, green, gold and orange spread outward into a separate diamond.
Hands-on tip: Lay all four triangles flat with full edges joined and no overlap with existing squares.
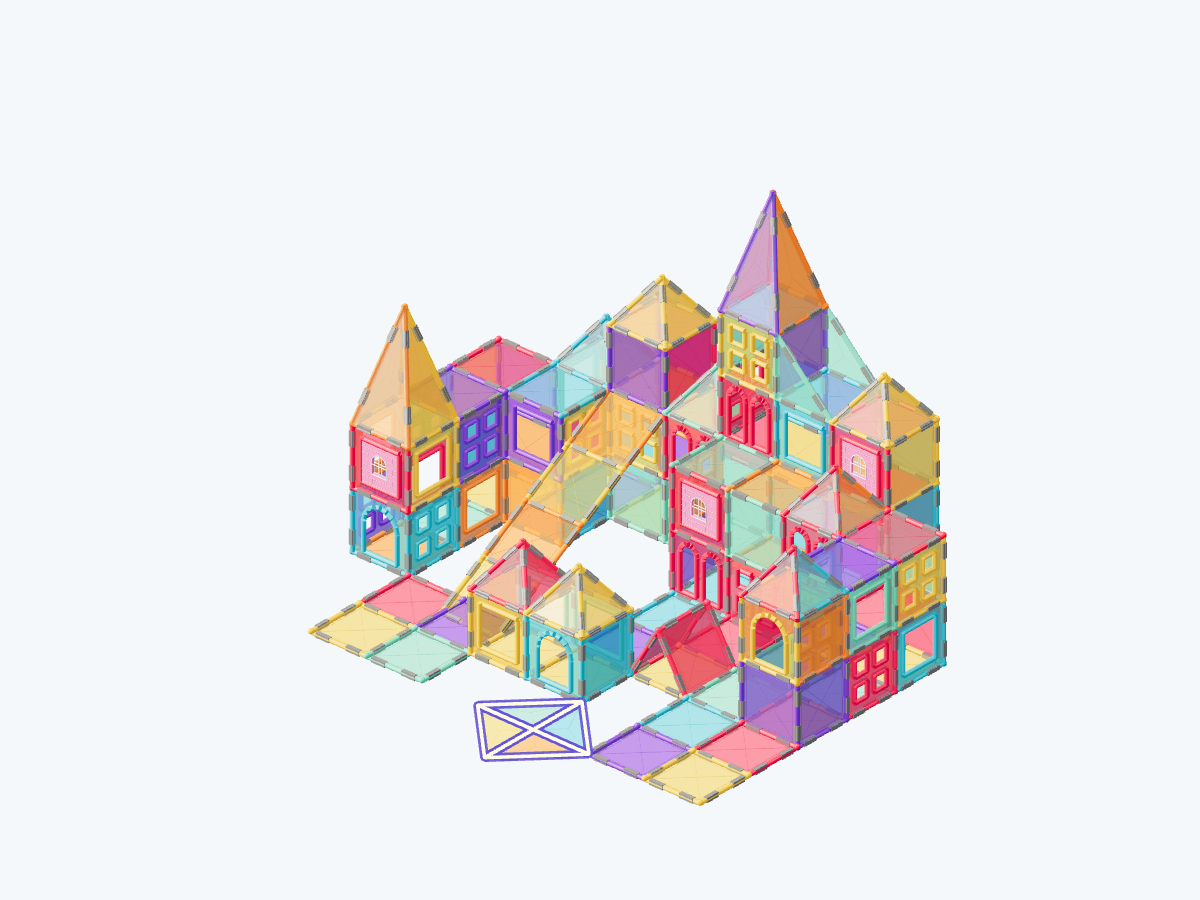
Step 30 / 31 31. Finish the courtyard with low colored battlements
Add in this step: 4 battlement tiles · 2 short rectangle tiles (1 × 0.5)
Line the courtyard edge with blue, pink, purple and yellow battlements and keep an entrance in the middle.
Hands-on tip: Join each bottom edge to a floor and connect the corner returns; keep the entrance open.
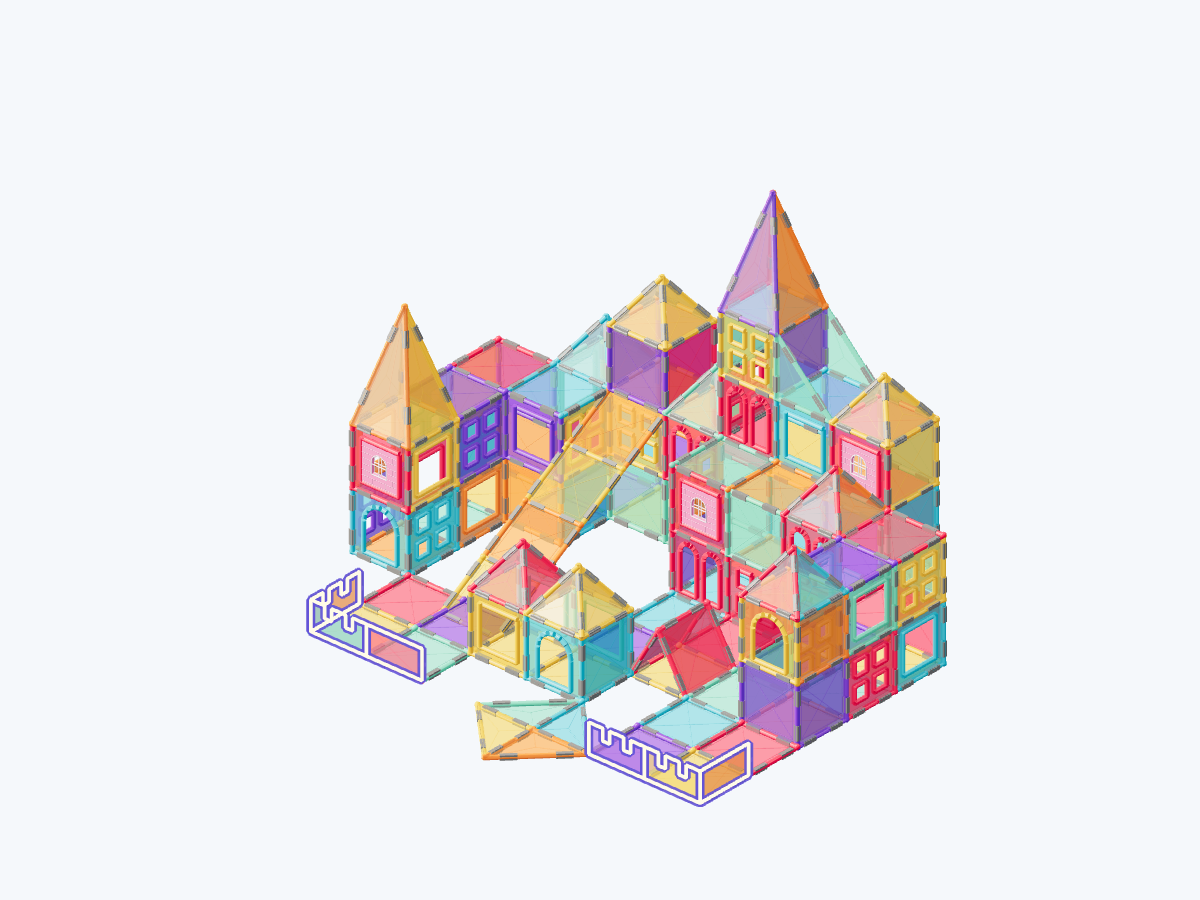
Step 31 / 31
A little help for grown-ups
You do not need to plan a lesson. Use these prompts when you reach a tricky step, or when your child wants to try an idea of their own.
1. Lay out the U-shaped foundation
Use the top view to identify the keep, wings and courtyard.
See this step2. Lay out the U-shaped foundation
Use the top view to identify the keep, wings and courtyard.
See this step3. Build storey 1 of the colored walls
Check from the front after each section to preserve the stepped silhouette.
See this step4. Build storey 1 of the colored walls
Check from the front after each section to preserve the stepped silhouette.
See this step5. Build storey 1 of the colored walls
Check from the front after each section to preserve the stepped silhouette.
See this step6. Build storey 2 of the colored walls
Check from the front after each section to preserve the stepped silhouette.
See this step7. Build storey 2 of the colored walls
Check from the front after each section to preserve the stepped silhouette.
See this step8. Build storey 2 of the colored walls
Check from the front after each section to preserve the stepped silhouette.
See this step10. Build storey 3 of the colored walls
Check from the front after each section to preserve the stepped silhouette.
See this step12. Build storey 4 of the colored walls
Check from the front after each section to preserve the stepped silhouette.
See this step14. Crown the keep with its tall spire
Assemble the complete cap on the table before lifting it.
See this step15. Add the tall orange left spire
Check that the keep remains highest while the left spire steps down.
See this step16. Place colorful small spire 1
Use the front view to locate the tower; colors can be substituted.
See this step17. Place colorful small spire 2
Use the front view to locate the tower; colors can be substituted.
See this step18. Place colorful small spire 3
Use the front view to locate the tower; colors can be substituted.
See this step19. Place colorful small spire 4
Use the front view to locate the tower; colors can be substituted.
See this step20. Place colorful small spire 5
Use the front view to locate the tower; colors can be substituted.
See this step21. Place colorful small spire 6
Use the front view to locate the tower; colors can be substituted.
See this step22. Add the keep’s descending shoulder
From the front, follow the descending outline to the right of the central spire.
See this step24. Connect the long golden ramp
Locate the full ramp first, with one person supporting each end.
See this step25. Lay out the colorful courtyard
Find a route from the entrance to the keep in the top view.
See this step26. Lay out the colorful courtyard
Find a route from the entrance to the keep in the top view.
See this step27. Build the pair of courtyard gatelets
The low gateway makes the rear spires appear taller.
See this step28. Cap the gatelets in red and gold
Look from the front: the gatelets, colored windows and spires form successive layers.
See this step29. Add an open A-frame to the right courtyard
Look through the triangular opening toward the colored windows.
See this step30. Make the colored courtyard diamond
Use the top view to check the four colors, then see how they brighten the entrance.
See this step31. Finish the courtyard with low colored battlements
Compare the complete castle with the source photo from the front and side.
See this stepTake this plan to the building table
Your subscription includes printing and saving PDF guides: materials, views, building steps and parent tips, ready for your family to use together. A parent manages sign-in and the subscription.
Print / Save as PDF