Dadafu
A family building guide
Ready-Together Fire Engine
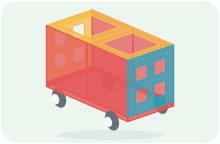
8 magnetic tiles + 1 car base · 4 steps
A blue-window cab, rear equipment bay and a flat two-frame roof ladder
What pieces do you need?
- ×1car bases
- ×4square tiles
- ×2four-pane window tiles
- ×2square frame tiles
Compare with your tile set
Choose the exact set to compare quantities. For other brands or mixed boxes, use each plan’s piece list.
Four squares, two windows, two open frames and one car base: nine pieces. Frames and windows need 1-by-1 outer edges and the deck must be 2-by-1. Check sizes and magnets. Physical assembly has not been tested.
A finger friend needs help at the street corner. Build a compact red fire engine together and fit its fixed roof ladder. Take turns as driver and crew member to help a friend find the way home.
Before you build with real tiles
- Use squares, open frames and window tiles with the same unit edge, plus a 2-by-1 chassis with compatible deck magnets. Check sizes and magnet positions first. Any colors can be used.
- This is a digital design; physical assembly has not been tested. Matching quantities, digital connections and physics simulations do not replace a hands-on build.
- Build on a flat surface, with an adult steadying each stage. Push the chassis gently instead of lifting by the roof. Use pretend cargo and missions only.
- The cab and rear equipment bay are only one square high. Two open frames lie flat on the wall tops as a fixed roof ladder, with no overhang beyond the vehicle.
- The ladder is a fixed shape; it cannot raise, extend or carry objects. The equipment bay is for pretend play and requires no extra accessories.
How to build it, step by step
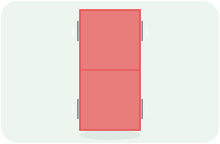
1. Choose a parking spot
Add in this step: 1 car bases
Place the chassis flat, with its long direction running front to back. The blue front window will mark the nose.
Hands-on tip: Try one square against a deck edge, then remove it. Use a 2-by-1 magnetic deck; the wheels are not attachment points.
Step 1 / 4 2. Build the compact blue-window cab
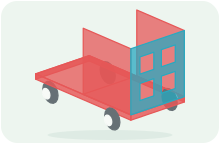
Add in this step: 2 square tiles · 1 four-pane window tiles
Stand a square on each side of the front half, with a blue window across the nose. Keep the cab one tile high and leave its roof open.
Hands-on tip: Join the bottom edges to the chassis and close both front corners. The window’s outer frame must match a square; do not rely on interior window bars for support.
Step 2 / 4 3. Add the rear equipment bay
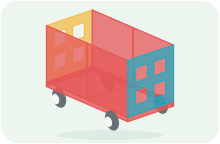
Add in this step: 2 square tiles · 1 four-pane window tiles
Put a square on each rear side and a window across the back. Keep it the same height as the cab; the rear window marks the pretend equipment bay.
Hands-on tip: Connect both side walls to the deck and the cab sides. Close the rear corners with the window. Do not load real objects into the bay.
Step 3 / 4 4. Lay two frames into a roof ladder
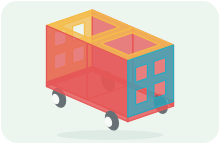
Add in this step: 2 square frame tiles
Lay one open frame over the cab and one over the equipment bay. Join their middle edges and rest every outside edge on the wall tops; the two openings make a small ladder shape.
Hands-on tip: The frames are the roof; do not stack square tiles beneath them. Keep the fixed ladder flat, with no extension, lifting or cargo.
Step 4 / 4
A little help for grown-ups
You do not need to plan a lesson. Use these prompts when you reach a tricky step, or when your child wants to try an idea of their own.
1. Choose a parking spot
Let your child choose the starting spot while you check the magnetic fit.
See this step2. Build the compact blue-window cab
Your child chooses the direction while you steady the corners. Decide who drives first.
See this step3. Add the rear equipment bay
Mime a tool your crew might need, then let your child decide where it belongs in the pretend bay.
See this step4. Lay two frames into a roof ladder
One builder holds the body while the other places a frame. Swap jobs, then name your crew together.
See this stepKeep playing together
Lay out the nine pieces. Choose a parking spot and a street corner that needs help. Fingers can be crew members and friends, so no extra props are needed.
Take a role, then swap
Driver and designer
Your child chooses the colors and direction, then builds a favorite side.
Building partner and crew
Steady the corners and lay the roof frames together. Swap driver and crew roles after setting off.
Start your story
A small mission arrives
A finger is lost at the street corner. The crew asks where it wants to go, and the driver slowly rolls over.
Help a friend get home
Let the finger friend walk along the table beside the engine to the parking spot. Swap who chooses the next friend to help, then set off again.
Try a variation
Use the same pieces in different colors to make a repair truck or community helper vehicle. Keep the ladder flat and let your child choose today’s new mission.
Celebrate your build
Return to your parking spot and share how you worked together. Give your little crew a name, ready for another day of play.
Take this plan to the building table
Your subscription includes printing and saving PDF guides: materials, views, building steps and parent tips, ready for your family to use together. A parent manages sign-in and the subscription.
Print / Save as PDF