Dadafu
A family building guide
Harvest Pumpkin · 104-Piece Kit
25 magnetic tiles · 4 steps
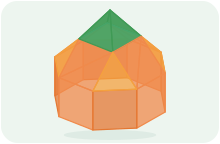
An eight-sided orange belly on the table, triangle shoulders and a short green stem
What pieces do you need?
- ×9square tiles
- ×8right triangle tiles
- ×8equilateral triangle tiles
Compare with your tile set
Choose the exact set to compare quantities. For other brands or mixed boxes, use each plan’s piece list.
Adapted to the OugerToy 104-piece kit shapes and counts shown in the reference photo. Colors may vary. Dimensions use nominal ratios; actual dimensions and magnet strength have not been measured, and physical assembly has not been tested.
The autumn pumpkin is ready! Join eight squares in a ring so its round belly stands directly on the table. Close the triangle shoulders, add the green lid, then join four green triangles into a short pointed stem. Gather around it to tell an autumn story.
Before you build with real tiles
- Use 9 squares, 8 equilateral triangles and 8 wide triangles, within the OugerToy 104-piece kit counts. Wide triangles are modeled as right triangles with both short edges matching a square edge; align the real edges to check before building. Colors may vary.
- Keep the original eight-sided belly, triangle shoulders and green stem. Remove the small base and lower slopes that carried the whole shell so all eight belly edges rest on the table. The model is a little shorter with an open underside. The four upper facets still use paired wide triangles joined along their hypotenuses; no tile is stretched or cut.
- Build on a level table. An adult supports the unfinished shell and stem while full magnetic edges join. Carry from underneath, never by the stem. Keep candles and other heat sources out of real plastic tiles.
- This is a digital candidate adapted to the kit shapes and counts. Geometry and dynamics checks do not measure this physical kit’s magnet strength, thickness or load capacity. Physical assembly has not been tested.
How to build it, step by step
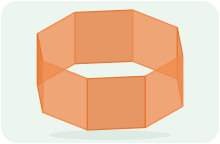
1. Stand the eight-sided belly on the table
Add in this step: 8 square tiles
Stand eight squares in a ring on a level table, alternating orange and deep orange. Rest every lower edge on the table and join neighboring upright edges into the round eight-sided belly.
Hands-on tip: One builder supports the joined walls while the other closes the ring. Check that all eight lower edges rest on the table before adding the shoulders.
Step 1 / 4 2. Close the triangle shoulders
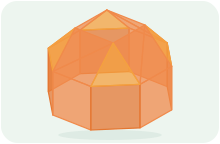
Add in this step: 8 right triangle tiles · 4 equilateral triangle tiles
Lean four pairs of orange wide triangles inward, then fill the four corners with amber equilateral triangles, leaving a small square opening at the top.
Hands-on tip: Join each first short edge to the belly rim and its partner along the long hypotenuse, then fill the corners. An adult steadies the top and aligns full magnetic edges.
Step 2 / 4 3. Close the little green lid
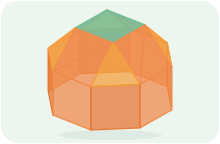
Add in this step: 1 square tiles
Lay one green square over the top opening. The sides and top are closed; the underside stays open with all eight lower belly edges on the table.
Hands-on tip: Align all four top edges before letting go. This hollow tile model must not hold heavy objects or a heat source.
Step 3 / 4 4. Close the short green pointed stem
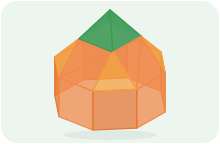
Add in this step: 4 equilateral triangle tiles
Attach an equilateral triangle to each green lid edge and lean all four inward until their tips meet in the middle.
Hands-on tip: Join each full base edge before closing the neighboring sides. An adult steadies the stem while it closes; carry the finished model from underneath.
Step 4 / 4
A little help for grown-ups
You do not need to plan a lesson. Use these prompts when you reach a tricky step, or when your child wants to try an idea of their own.
1. Stand the eight-sided belly on the table
Can the alternating orange faces make little pumpkin ribs?
See this step3. Close the little green lid
Turn it around. Can you find any seam that still needs closing?
See this step4. Close the short green pointed stem
From above, is the little pointed stem centered on the pumpkin?
See this stepTake this plan to the building table
Your subscription includes printing and saving PDF guides: materials, views, building steps and parent tips, ready for your family to use together. A parent manages sign-in and the subscription.
Print / Save as PDF