Dadafu

A family building guide
A Heart for You
24 magnetic tiles · 5 steps
Two full lobes, a little top notch and smooth diagonal sides meeting at one point
What pieces do you need?
- ×10right triangle tiles
- ×14square tiles
Compare with your tile set
Choose the exact set to compare quantities. For other brands or mixed boxes, use each plan’s piece list.
Uses the tile shapes listed in the OugerToy 104 photo, with one kit per build. Colors can vary; check your actual tile dimensions and magnetic connections.
Build a heart for someone you love. Bring its sloping sides together at the bottom, then leave two generous lobes and a little notch at the top.
Before you build with real tiles
- Adapted for the 104-piece kit. Lay every tile flat and look from above. Use the listed pieces for one picture, then return them before starting another.
- Colors are illustrative; substitute any colors in your kit. Match the actual tile shapes and join their edges without overlapping or stretching them.
How to build it, step by step
1. Join the pointed bottom
Add in this step: 2 right triangle tiles
Join two pink right triangles along their upright edges so they meet in one bottom point.
Hands-on tip: Keep every tile flat on the table. Match neighboring magnetic edges, leave the pictured gaps open and never stack faces. Colors can vary.

Step 1 / 5 2. Widen both sloping sides
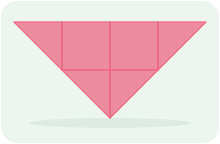
Add in this step: 2 square tiles · 2 right triangle tiles
Join the middle squares, then add a right triangle at each end to continue the straight sloping outline.
Hands-on tip: Keep every tile flat on the table. Match neighboring magnetic edges, leave the pictured gaps open and never stack faces. Colors can vary.
Step 2 / 5 3. Continue the long diagonal edges
Add in this step: 4 square tiles · 2 right triangle tiles
Join the middle squares, then add a right triangle at each end to continue the straight sloping outline.
Hands-on tip: Keep every tile flat on the table. Match neighboring magnetic edges, leave the pictured gaps open and never stack faces. Colors can vary.

Step 3 / 5 4. Fill the widest part
Add in this step: 6 square tiles
Join six pink squares in a row above the two sloping sides.
Hands-on tip: Keep every tile flat on the table. Match neighboring magnetic edges, leave the pictured gaps open and never stack faces. Colors can vary.
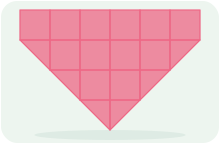
Step 4 / 5 5. Shape the two lobes and top notch
Add in this step: 2 square tiles · 4 right triangle tiles
Place a square between two right triangles on each side. The middle stays open as a little V-shaped notch.
Hands-on tip: Keep every tile flat on the table. Match neighboring magnetic edges, leave the pictured gaps open and never stack faces. Colors can vary.

Step 5 / 5
A little help for grown-ups
You do not need to plan a lesson. Use these prompts when you reach a tricky step, or when your child wants to try an idea of their own.
5. Shape the two lobes and top notch
Trace the outline. Can you find two lobes and one bottom point?
See this stepTake this plan to the building table
Your subscription includes printing and saving PDF guides: materials, views, building steps and parent tips, ready for your family to use together. A parent manages sign-in and the subscription.
Print / Save as PDF