Dadafu
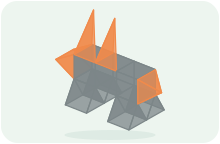
A family building guide
Long-Eared Rabbit · 104-Piece Kit
42 magnetic tiles · 10 steps
Four splayed feet and a pointed nose, paired-panel long ears and a closed little tail
What pieces do you need?
- ×24square tiles
- ×14equilateral triangle tiles
- ×4tall triangle tiles
Compare with your tile set
Choose the exact set to compare quantities. For other brands or mixed boxes, use each plan’s piece list.
Adapted to the OugerToy 104-piece kit shapes and counts shown in the reference photo. Colors may vary. Dimensions use nominal ratios; actual dimensions and magnet strength have not been measured, and physical assembly has not been tested.
The rabbit raises its ears to hear a friend across the garden. Build four wide feet, a compact body and its pointed nose. Pair the four long triangles into two braced ears, then close a little pointed tail. Take turns whispering something only the rabbit can hear.
Before you build with real tiles
- Use 24 squares, 14 equilateral triangles and all 4 long triangles, within the OugerToy 104-piece kit counts. The digital long triangle has a base one square wide and a height of about 1.87 units; compare the real long triangles before building. Colors may vary.
- Each original foot remains a triangular prism made from two sloping squares and two equilateral triangles. The three-square body and projecting nose retain their original geometry. Every part of the model uses tiles from this kit.
- Each ear uses two long triangles joined along a long side. Their bases join two adjacent edges of the same roof square, forming a braced half tower with an open back. Pair the panels first, then support the ear root while joining both bases; never leave one upright panel attached only by its bottom edge.
- Four equilateral triangles form a short pointed tail. Their bases surround all four edges of the rear body wall, projecting backward. This replaces the original single-edge tail. Carry underneath the feet, never by the ears, nose or tail.
- This is a digital candidate adapted to the kit shapes and counts. Geometry and dynamics checks do not measure real magnet strength, ear-root capacity or shape tolerances. Physical assembly has not been tested; an adult should support and check each stage.
How to build it, step by step
1. Close one splayed rabbit foot
Add in this step: 2 square tiles · 2 equilateral triangle tiles
Lean two squares together until their upper edges meet, then close both ends with triangles. Set the four feet separately with their wide lower edges on the ground.
Hands-on tip: Keep each triangle base and both lower square edges on the table. Do not flatten the foot or layer tiles.
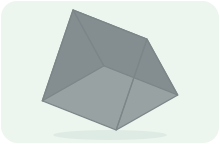
Step 1 / 10 2. Close one splayed rabbit foot
Add in this step: 2 square tiles · 2 equilateral triangle tiles
Lean two squares together until their upper edges meet, then close both ends with triangles. Set the four feet separately with their wide lower edges on the ground.
Hands-on tip: Keep each triangle base and both lower square edges on the table. Do not flatten the foot or layer tiles.

Step 2 / 10 3. Close one splayed rabbit foot
Add in this step: 2 square tiles · 2 equilateral triangle tiles
Lean two squares together until their upper edges meet, then close both ends with triangles. Set the four feet separately with their wide lower edges on the ground.
Hands-on tip: Keep each triangle base and both lower square edges on the table. Do not flatten the foot or layer tiles.

Step 3 / 10 4. Close one splayed rabbit foot
Add in this step: 2 square tiles · 2 equilateral triangle tiles
Lean two squares together until their upper edges meet, then close both ends with triangles. Set the four feet separately with their wide lower edges on the ground.
Hands-on tip: Keep each triangle base and both lower square edges on the table. Do not flatten the foot or layer tiles.

Step 4 / 10 5. Let four feet hold the little belly
Add in this step: 3 square tiles
Cover the front and rear foot ridges first, then join the middle square for a low body floor three squares long and one wide.
Hands-on tip: Join the complete side edges of both end floors to the magnetic foot ridges, then connect the middle square. An adult should support the unfinished floor.

Step 5 / 10 6. Enclose the compact gray body
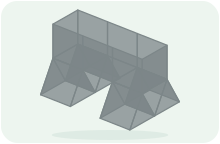
Add in this step: 8 square tiles
Join three squares along either side and one square at each end to enclose a low body box.
Hands-on tip: Join every wall to a full outer floor edge and keep the end panels free of overlapping layers.
Step 6 / 10 7. Close the flat rabbit back
Add in this step: 3 square tiles
Add three roof squares to finish the compact gray body, leaving all four feet spread out beneath it.
Hands-on tip: Join the roof from existing wall edges and avoid pressing its middle.

Step 7 / 10 8. Give the rabbit a pointed nose
Add in this step: 2 equilateral triangle tiles · 2 square tiles
Two orange triangles project from the body front with the nose point halfway up. Close the upper and lower head surfaces with sloping squares.
Hands-on tip: Join the triangle bases to the vertical front body edges and close the two angled nose edges with squares. Keep every panel outside the body wall.

Step 8 / 10 9. Pair four long triangles into two ears
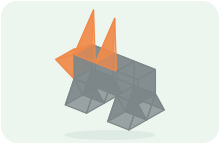
Add in this step: 4 tall triangle tiles
For each ear, join two long triangles along a long side, then attach their bases to adjacent edges of the same roof square. Put one ear on the front back square and the other on the middle square; leave the backs open.
Hands-on tip: Join each pair along the long side first. An adult supports the ear root while both full bases attach. The two faces brace one another; do not stand four separate panels upright.
Step 9 / 10 10. Close the little pointed tail
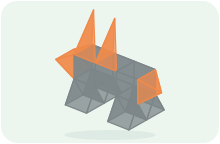
Add in this step: 4 equilateral triangle tiles
Join four orange equilateral triangles into a short pointed cap. Attach its base around all four edges of the rear body wall, with its tip projecting backward.
Hands-on tip: Close all four sides beside the model first. An adult supports the tail while its four full base edges join the rear wall. Do not hang a single triangle or lift the rabbit by its tail.
Step 10 / 10
A little help for grown-ups
You do not need to plan a lesson. Use these prompts when you reach a tricky step, or when your child wants to try an idea of their own.
1. Close one splayed rabbit foot
One builder holds the slopes and the other adds the triangles. What little tent does this foot resemble?
See this step2. Close one splayed rabbit foot
One builder holds the slopes and the other adds the triangles. What little tent does this foot resemble?
See this step3. Close one splayed rabbit foot
One builder holds the slopes and the other adds the triangles. What little tent does this foot resemble?
See this step4. Close one splayed rabbit foot
One builder holds the slopes and the other adds the triangles. What little tent does this foot resemble?
See this step5. Let four feet hold the little belly
Look from the front and back. Does the belly join feet on both sides?
See this step6. Enclose the compact gray body
Find the long and short body edges. Let each builder complete one side.
See this step8. Give the rabbit a pointed nose
What can the rabbit smell? Take turns finding an imaginary flower with its nose.
See this step9. Pair four long triangles into two ears
Can you see both ear tips from the side? Take turns whispering something the rabbit can hear.
See this step10. Close the little pointed tail
Which projects farther, the nose or the tail? How might a happy rabbit greet a friend?
See this stepTake this plan to the building table
Your subscription includes printing and saving PDF guides: materials, views, building steps and parent tips, ready for your family to use together. A parent manages sign-in and the subscription.
Print / Save as PDF