Dadafu
A family building guide
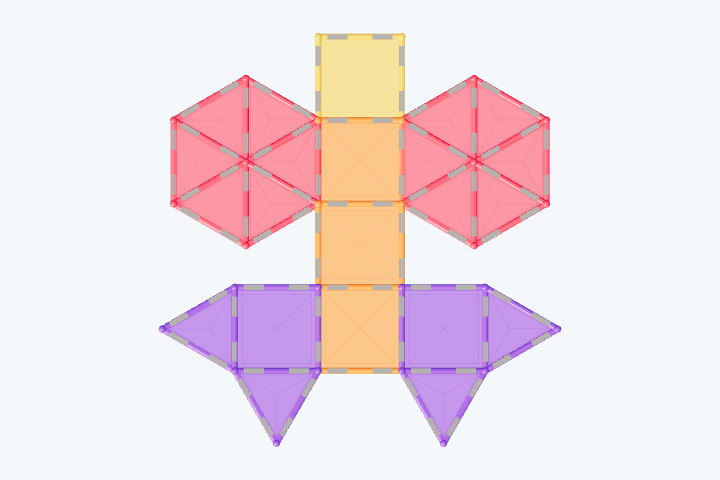
Open-Wing Butterfly Mosaic
22 magnetic tiles · 4 steps
A slim body between two large upper wings and two smaller lower wings
What pieces do you need?
- ×6square tiles
- ×16equilateral triangle tiles
Compare with your tile set
Choose the exact set to compare quantities. For other brands or mixed boxes, use each plan’s piece list.
Start with the narrow body. Add a tile on the left, then match it on the right. Open the large upper wings and smaller lower wings like a butterfly in flight.
Before you build with real tiles
- Lay all six squares and 16 equilateral triangles flat, with tips pointing outward. No right triangles, supports or upright antennae are needed.
- Use the top view to compare the silhouette. Keep the larger upper wings, smaller lower wings and inward notches; do not fill the design into a rectangle.
- This is Dadafu’s flat adaptation, not the folded 3D butterfly in the official tutorial.
How to build it, step by step
1. Make a narrow body
Add in this step: 4 square tiles
Join four orange squares into one straight column. The top square is the head.
Hands-on tip: Keep all four squares flat with full edges touching.

Step 1 / 4 2. Open two broad hexagonal upper wings
Add in this step: 12 equilateral triangle tiles
Use six pink triangles for each hexagonal wing. Join an inner upright edge to the body and let the broad outer edges spread outward.
Hands-on tip: Bring all six triangle tips together at each wing center. Match full edges and keep every tile flat.

Step 2 / 4 3. Add smaller lower wings and keep a waist
Add in this step: 2 square tiles
Join one purple square to each side of the lowest body tile. Leave the spaces above them open to separate the wing pairs.
Hands-on tip: Do not fill the gaps. Each lower wing joins only the lowest body square.

Step 3 / 4 4. Finish the small lower wing points
Add in this step: 4 equilateral triangle tiles
Add one triangle to the outside and one beneath each purple lower wing. Both wing pairs are complete.
Hands-on tip: Point lower tips toward the tail and side tips outward. Never overlap tile faces.

Step 4 / 4
A little help for grown-ups
You do not need to plan a lesson. Use these prompts when you reach a tricky step, or when your child wants to try an idea of their own.
2. Open two broad hexagonal upper wings
Finish one side, then mirror its outline on the other.
See this step3. Add smaller lower wings and keep a waist
Trace the outline and find the little notches between upper and lower wings.
See this step4. Finish the small lower wing points
Pretend to flap the wings and choose a flower for your butterfly.
See this stepTake this plan to the building table
Your subscription includes printing and saving PDF guides: materials, views, building steps and parent tips, ready for your family to use together. A parent manages sign-in and the subscription.
Print / Save as PDF