Dadafu

A family building guide
Little Airport Plane
24 magnetic tiles + 1 car base · 7 steps
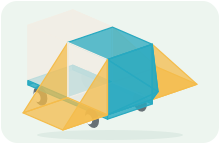
A long body with a pointed blue nose, two low braced wings and a tapered tail
What pieces do you need?
- ×1car bases
- ×12square tiles
- ×4right triangle tiles
- ×8equilateral triangle tiles
Compare with your tile set
Choose the exact set to compare quantities. For other brands or mixed boxes, use each plan’s piece list.
Prepare 1 two-square magnetic car base, 12 squares, 4 right triangles with two square-length legs, and 8 unit-edge equilateral triangles. Colors may vary. The 104-piece set match is conditional on these dimensions and the base magnet positions; it is not a physical build test.
The next flight is getting ready at our pretend airport. Build a little plane together, check its wings, then take turns guiding it slowly to the runway and back to its stand.
Before you build with real tiles
- The wheelbase is one square wide and two squares long, with magnets along the deck edges. Check the dimensions and magnet positions on your own set before building.
- Each low wing has a square floor and two right-triangle braces. Both legs of each brace must meet complete edges of the wing and fuselage. Keep holding the pieces until all three panels are joined.
- The nose and tail each use four joined equilateral triangles. Assemble each complete section beside the model, then join it around the front or rear wall. Both point along the body, with no upright roof or single triangle fin.
- This is a ground-rolling airport toy, not a flying model. Gently push or carry it by the base, never the wings, nose or tail. Its wheels, low wings and clear route need a check before every taxi run.
- This is an original digital plan, not a physically tested design. Colors are illustrative and may be substituted. Digital checks do not measure real magnet strength, tipping or load capacity.
How to build it, step by step
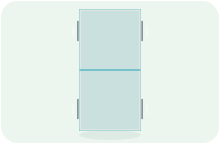
1. Park the base and lay two floor squares
Add in this step: 1 car bases · 2 square tiles
Choose the long direction of the base for the fuselage and cover its deck with two squares.
Hands-on tip: Align the floor edges with the base magnets. The deck is two squares long and one wide; the tires are not magnetic.
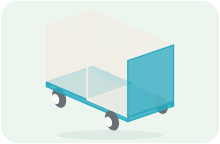
Step 1 / 7 2. Enclose the little fuselage
Add in this step: 6 square tiles
Join two squares along each long side and one at each end. The blue front marks the cockpit direction.
Hands-on tip: One person holds the sides while the other joins the ends. All six walls meet complete edges of the deck or floor.
Step 2 / 7 3. Close the cockpit and rear roof
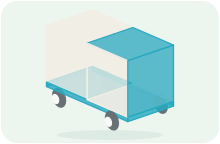
Add in this step: 2 square tiles
Place the blue roof at the front and the white roof at the rear to close the fuselage box.
Hands-on tip: Finish the wall corners before adding the roof. Each roof edge should meet a neighboring wall or roof tile.
Step 3 / 7 4. Brace the left wing at both ends
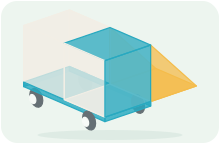
Add in this step: 1 square tiles · 2 right triangle tiles
Join a yellow square to the left of the front half at deck height. Add a right triangle at its front and rear, with the diagonal edges facing outward.
Hands-on tip: An adult holds the wing. Each brace joins a full upright fuselage edge and a full front or rear wing edge. Release slowly only after all three panels are connected.
Step 4 / 7 5. Brace the right wing at both ends
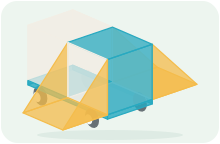
Add in this step: 1 square tiles · 2 right triangle tiles
Join a yellow square to the right of the front half at deck height. Add a right triangle at its front and rear, with the diagonal edges facing outward.
Hands-on tip: An adult holds the wing. Each brace joins a full upright fuselage edge and a full front or rear wing edge. Release slowly only after all three panels are connected.
Step 5 / 7 6. Close four blue triangles into the nose
Add in this step: 4 equilateral triangle tiles
Join the sloping edges of four equilateral triangles into a pointed section with one open face. Attach its four base edges around the blue front wall, with the tip pointing forward.
Hands-on tip: Preassemble the complete four-panel nose beside the model and have an adult support it during attachment. Each base meets a complete front-wall edge, not a corner alone.
Step 6 / 7 7. Point the closed tail backward and prepare to taxi
Add in this step: 4 equilateral triangle tiles
Join the other four equilateral triangles into a tapered tail. Attach its four base edges around the white rear wall, with the tip extending backward. Check both wings, then start a slow ground taxi.
Hands-on tip: Close all four tail panels before an adult supports them against the rear wall; the tail does not sit on the roof. Leave no lone upright triangle. Carry by the base, never the wings, and do not throw or fly the model.

Step 7 / 7
A little help for grown-ups
You do not need to plan a lesson. Use these prompts when you reach a tricky step, or when your child wants to try an idea of their own.
1. Park the base and lay two floor squares
Let your child choose which end is the nose and which is the tail.
See this step4. Brace the left wing at both ends
Ask your child to point to what each of the two straight triangle edges joins.
See this step5. Brace the right wing at both ends
Ask your child to point to what each of the two straight triangle edges joins.
See this step6. Close four blue triangles into the nose
From above, does the nose point toward the direction you chose?
See this step7. Point the closed tail backward and prepare to taxi
Point to the nose at the front and the tail at the back. Where will the first flight go?
See this stepKeep playing together
Set the listed pieces beside a clear, level patch of floor. Agree where the airport stand and runway are; pointing is enough, with no extra props needed.
Take a role, then swap
Aircraft builder
The child chooses the colors and joins the next piece. The adult holds the base and helps close both wing braces before letting go.
Pilot and airport guide
One person gently pushes the base while the other calls “wait”, “straight ahead” and “back to the stand”. Swap after one short taxi trip.
Start your story
Ready at the stand
Choose a destination and check that the two wings are clear of the floor. Point to the nose, then wait for the airport guide to open the route.
A slow runway visit
Roll slowly toward the pretend runway, pause, then return to the stand. If a part loosens, stop and repair it together before moving again. Keep the plane on the ground.
A different flight
Swap roles and pick a new destination. Let the child decide where to park and tell the passengers what they might see on their imaginary journey.
Try a variation
Try a new color pattern or move the imaginary airport stand. Keep both triangular braces on each wing and keep the nose and tail closed; do not lengthen a wing by hanging more tiles from it.
Celebrate your build
Park the plane and let your child give it a name. Take turns showing the part each person helped build, then choose whether to keep the airport ready or take the model apart together.
Take this plan to the building table
Your subscription includes printing and saving PDF guides: materials, views, building steps and parent tips, ready for your family to use together. A parent manages sign-in and the subscription.
Print / Save as PDF